Learning to Draw- The Fundamentals
The Nine Fundamental Laws of Drawing create the illusion of depth. They are as follows:
It is impossible to draw a three- dimensional image without applying one or more of these fundamental laws. These nine tools are foundational elements, never changing, always applicable, and totally transferrable.
In addition to the Nine Fundamental Laws for Drawing, there are three principles to keep in mind: attitude, bonus details, and constant practice. These are vital to successful drawing.
Without exercising these three principles, you will not be able to grow as an artist. Each one is essential to your creative development.
In this unit, we will focus on how the Nine Laws are applied to the four basic "molecules." or building blocks, of three- dimensional drawing: the sphere, the cube, the cylinder, and the cone.
With each lesson, I will be introducing new information, terms, and techniques, but I will also be repeating definitions and applications you've previously learned.
- Foreshortening: Distort and object to create the illusion that one part of it is closer to your eye.
- Placement: Place an object lower on the surface of a picture to make it appear closer to your eye.
- Size: Draw an object larger to make it appear closer to your eye.
- Overlapping: Draw an object in front of another object to create the visual illusion that it is closer to your eye.
- Shading: Draw darkness on an object opposite the positioned light source to create the illusion of depth.
- Shadow: Draw darkness on the ground next to the object, opposite the positioned light source, to create the illusion of depth.
- Contour lines: Draw curving lines wrapping around the shape of a round object to give it volume and depth.
- Horizon line: Draw a horizontal reference line to create the illusion that objects in the picture are varying distances from the eye.
- Density: Create the illusion of distance by drawing objects lighter and with less detail.
It is impossible to draw a three- dimensional image without applying one or more of these fundamental laws. These nine tools are foundational elements, never changing, always applicable, and totally transferrable.
In addition to the Nine Fundamental Laws for Drawing, there are three principles to keep in mind: attitude, bonus details, and constant practice. These are vital to successful drawing.
- Attitude: Nourishing your "I can do this" positive attitude is a crucial part of learning any new skill.
- Bonus details: Add your own unique ideas and observations to your drawing to make it truly your own expression.
- Constant practice: Repeated daily application of any new learned skill is absolutely necessary for successful mastery of the skill.
Without exercising these three principles, you will not be able to grow as an artist. Each one is essential to your creative development.
In this unit, we will focus on how the Nine Laws are applied to the four basic "molecules." or building blocks, of three- dimensional drawing: the sphere, the cube, the cylinder, and the cone.
With each lesson, I will be introducing new information, terms, and techniques, but I will also be repeating definitions and applications you've previously learned.
Test Yourself! Prior Knowledge Assessment
In this lesson, I want you to draw a few images for me. Consider these "warm up" scribbles. Relax. I want you to draw the images that follow in order to give yourself a baseline skill assessment of where you are now, as compared to where you will be at the end of this unit.
Open your sketchbook. At the top of the first page write "Day 1- Introduction: The Pretest, and today's date. now spend two minutes drawing a house. Just from your imagination, don't look at any pictures. Next, spend two minutes drawing an aeroplane. And finally, spend two minutes drawing a bagel.
Open your sketchbook. At the top of the first page write "Day 1- Introduction: The Pretest, and today's date. now spend two minutes drawing a house. Just from your imagination, don't look at any pictures. Next, spend two minutes drawing an aeroplane. And finally, spend two minutes drawing a bagel.
Lesson 1- The Sphere
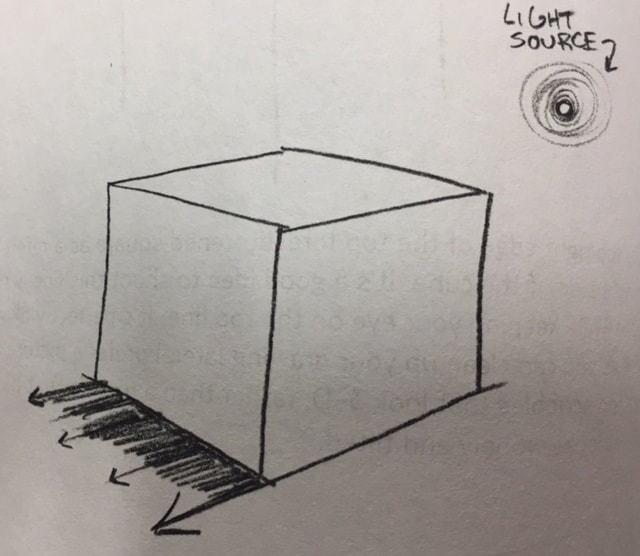
Learning how to draw is in large part learning how to control light in your picture. In this lesson you will learn how to identify where your light source is and where to shade objects in your drawing. Let's draw a three dimensional sphere.
1) Turn to the next available page in your sketchbook. Draw a circle. Don't street if your circle looks like an egg or a squished blob. Just put the pencil to the paper, and draw a circular shape. If you want, trace the bottom of your water bottle, or use a coin to trace around.
1) Turn to the next available page in your sketchbook. Draw a circle. Don't street if your circle looks like an egg or a squished blob. Just put the pencil to the paper, and draw a circular shape. If you want, trace the bottom of your water bottle, or use a coin to trace around.

2) Determine where you want your light source. Wait, what's a light source? How do you determine where a light source is? Im feeling overwhelmed already! Ahhhh! Don't throw your sketchbook across the room just yet!
To draw a three- dimensional picture, you need to figure out what direction the light is coming from and how it is hitting your object. Then you apply shading (a shadow) opposite that light source. Check this out: Hold your pencil about an inch above your paper, and notice the shadow it makes. If the light in the room is directly above the pencil, for example, the shadow will be directly below your pencil. But if the light is coming at the pencil from an angle, the shadow on the paper will extend out away from the light. It's pretty much common sense, but being aware o where the light is coming from, and going to, is an amazingly effective way of bringing your drawings to life. Play around with your pencil and the shadow it makes for a few minutes, moving it around and up and down. Place one end of the pencil directly on your paper, and note the way the shadow begins attached to the pencil and is thinner and darker than the shadow cast when the pencil is in the air. The shadows called a cast shadow.
For the purpose of this lesson, position a single light source above and to the right of your sphere like I have drawn here. GO ahead and draw a little swirly sun right on your sketchbook page.

3) Just like the cast shadow your pencil created on the table, the sphere we are drawing will cast a shadow onto the ground surface next to it. Cast shadows are fantastic visual anchors that help secure your objects to the ground surface in your picture. Look how I have drawn my cast shadow off to the side of the sphere below. Now draw a cast shadow o your sphere opposite your light source position on your sketchbook page. It does not matter if you think it looks sloppy, messy, or scribbly. These drawings are for skill practice.
Just remember these two important points: Postion your light source, and cast a shadow onto the ground next to the object and opposite the light source.
Just remember these two important points: Postion your light source, and cast a shadow onto the ground next to the object and opposite the light source.

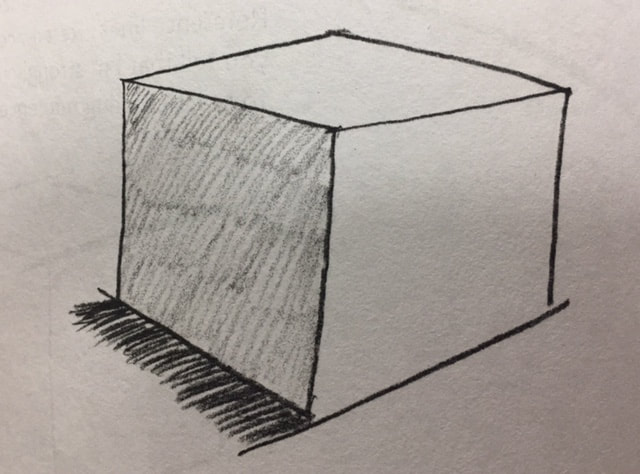
4) Scribble shading on the circle opposite the light source. It's okay to go outside the lines- don't worry about being perfect.
Notice how I have scribbled a bit darker on the edge farthest from the light source and how I have scribbled lighter as the shading curves up towards the light source? This is called blended shading. It is an awesome tool to learn to really create the "pop-out" illusion of three- dimensional drawing.
Notice how I have scribbled a bit darker on the edge farthest from the light source and how I have scribbled lighter as the shading curves up towards the light source? This is called blended shading. It is an awesome tool to learn to really create the "pop-out" illusion of three- dimensional drawing.

5) Use your finger to smudge- blend your shading like I have done here. Check this out: Your finger is actually an art tool similar to a paintbrush! Cool effect, isn't it!?

Voila! Congratulations! You have turned a scribbled circle into a three- dimensional sphere. Is this easy or what? Here's what we have learned so far:
- Draw the object
- Identify the light source
- Shade
It is important that you can take what you have learned and apply it to real life objects in order for these skills to be fully transferable. In future lessons we will be applying the concepts you have learned in drawing this three- dimensional sphere to drawing fun and interesting objects you see in the world around you. Whether you want to draw a colourful bowl of fruit on a table or a sketch of a family member in rea life of from a photograph, you will have the tools to do it.
Extension Task/ Homework Task
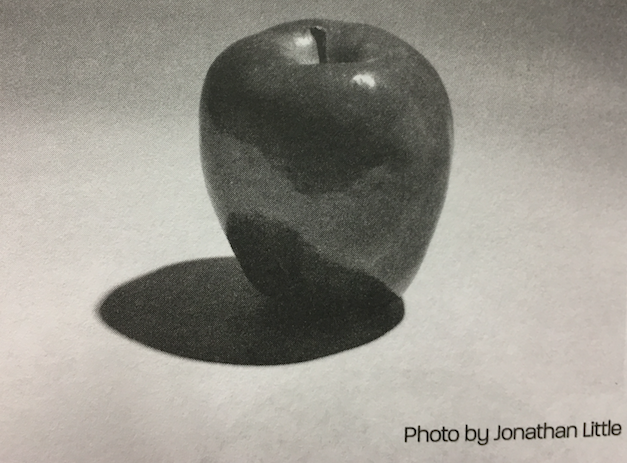
Lets start with drawing a pice of fruit, an apple. In following lessons we will tackle more challenging objects, such as buildings and people.
Take a look at this photograph of an apple with the light source low and on the right and see if you can copy it.
Take a look at this photograph of an apple with the light source low and on the right and see if you can copy it.
Lesson 2- Overlapping Spheres
Now, lets use that sphere skill of yours to draw globes all over the place.
1) Space permitting, continue on the same sketchbook page. Draw a circle.
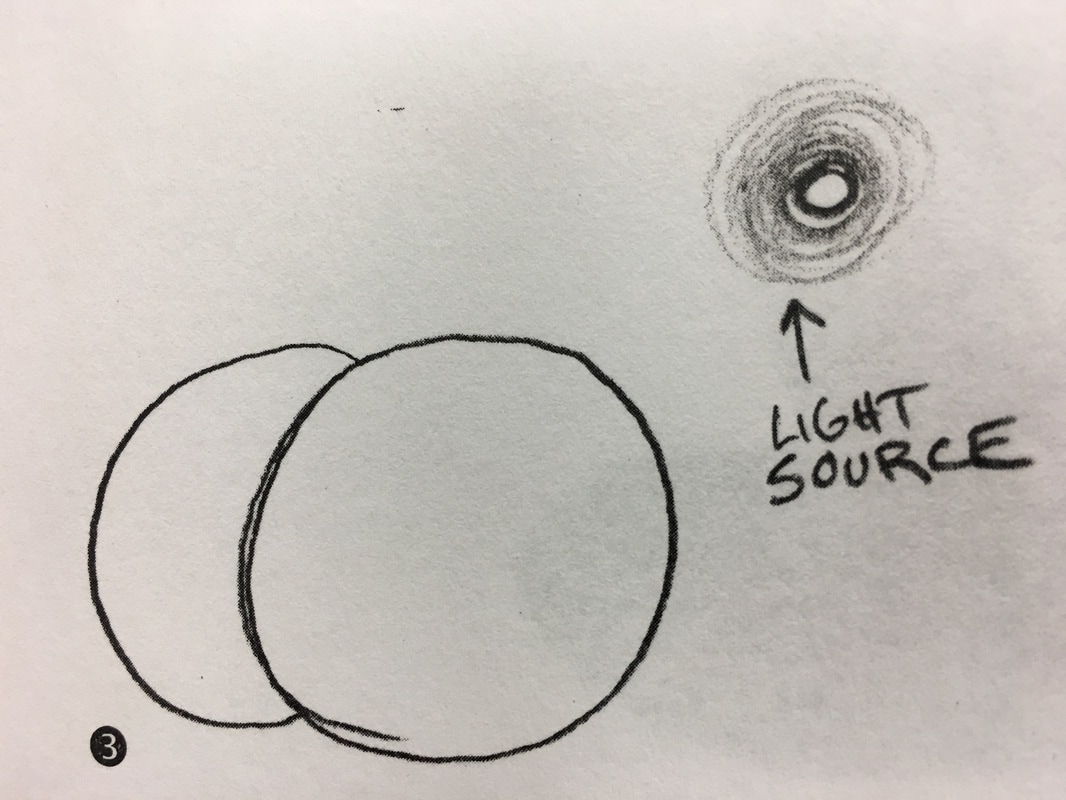
2) Draw a second sphere behind the first one. How? As you draw this second sphere, you will be using three new drawing laws. Three at once! Have no fear: We will take them one concept at a time, and it will take far longer to read about them than to use them. Take a look at my example below.
1) Space permitting, continue on the same sketchbook page. Draw a circle.
2) Draw a second sphere behind the first one. How? As you draw this second sphere, you will be using three new drawing laws. Three at once! Have no fear: We will take them one concept at a time, and it will take far longer to read about them than to use them. Take a look at my example below.


The second sphere is a bit smaller than the first sphere, a bit higher up on the paper, and tucked behind the first sphere. In doing this, this image uses three drawing laws: size, placement, and overlapping. go ahead and write theres notes in your sketchbook.
Size= Draw objects larger to make them look closer; draw them smaller to make them look farther away.
Placement= Draw objects lower on the surface of the paper to make them look closer; draw them higher up on the paper to make them look farther away.
Overlapping= Draw objects in front of or partially blocking the view of other objects to make them look closer; draw them tucked behind other objects to make them look farther away.
Go ahead and draw the second sphere smaller , higher, and behind the first one like my sketch below.
3) Determine where your imaginary light source will be positioned. This is probably the most important step in drawing realistically. Without a determined light source position, your drawing will not have consistent shading. Without consistent shading, your drawing will not pop out and look three- dimensional.
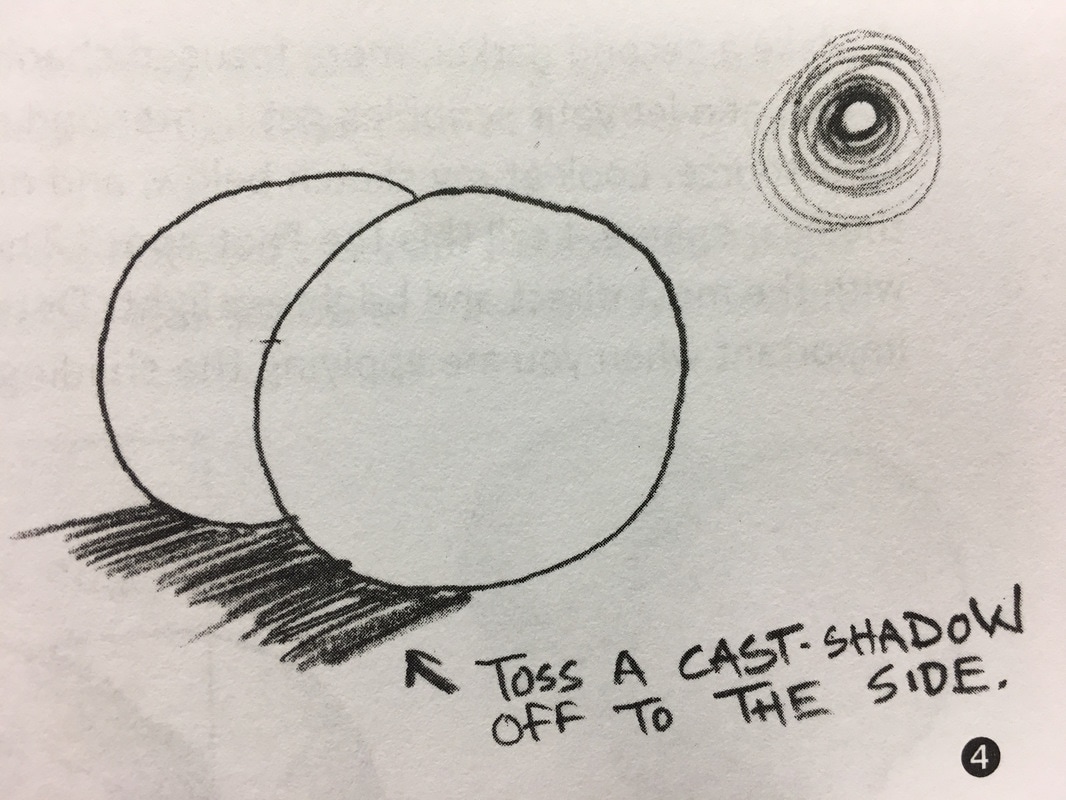
4) Keeping in mind the position of your light source, draw a cast shadow. Remember that to goes off to the side, as if it is on the ground, in the direction opposite the light. You do not need a ruler to determine the exact mathematical angle. Just eyeball it for now. As I said earlier, a good solid cast shadow will anchor your drawing to the surface of your paper.
Remember that if at any time you get a bit confused, simply look at the sketch example and copy whats there. Be patient, all this information will be repeated throughout the unit.
Remember that if at any time you get a bit confused, simply look at the sketch example and copy whats there. Be patient, all this information will be repeated throughout the unit.
5) To separate objects in your drawing, draw a dark defining shadow in between the two spheres (I call this a nook and cranny shadow). This will help identify the depth between the two objects. Notice how I defined the dark nook and cranny shadow on the farthest sphere. Nook and cranny shadows are always applied under and behind near objects.
For an example, clasp your hands together on the table in front of you. Take a look at the tiny very dark nook and cranny shadows that define the edges of each finger and knuckle. In your sketchbook write, "Nook and cranny shadows: Separate, define, and identify objects in a drawing."
For an example, clasp your hands together on the table in front of you. Take a look at the tiny very dark nook and cranny shadows that define the edges of each finger and knuckle. In your sketchbook write, "Nook and cranny shadows: Separate, define, and identify objects in a drawing."

6) Hold your pencil loosely, and scribble the first layer of shading on both spheres. Shade the surfaces opposite your light source. When I shade, I make several passes over my drawing. This is our first "rough" shading pass. You'll notice that the shading lines below are all lined up away from the sun, but your shading lines do not have to be lined up. Just scribble in the dark area any way you want as long as it is opposite your light source.

7) Make a second darker, more focused shading pass over the spheres. Detail in the very dark edges, and let your scribbles get lighter and lighter as you move slowly towards your established light source. Look at the sketch below, and notice the labelled hot spot- this is the brightest spot which is on the nearest sphere. The hot spot is the area on an object that gets hit with the most direct and brightest light. Determining where the hot spot is in a drawing is very important when you are applying the shading.

8) Go ahead and make several more scribbles (blending shading passes) over these two spheres. Now for the fun part! Using your finger, carefully blend the shading from dark to light, trying to keep the hot spot crisp white. Don't worry if you smudge the shading outside the lines or into the hot spot. If you need to, you can use your eraser to clean the excess lines and smudges.

Awesome job! Look at your beautiful three- dimensional rendering!
Extension Task/ Homework Task
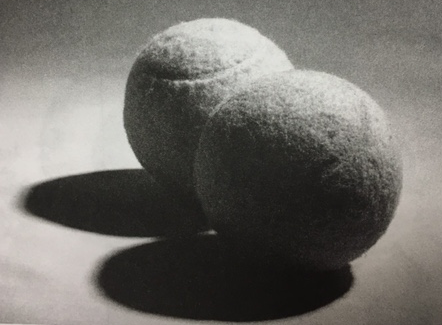
Now that you have conquered drawing spheres, try placing two tennis balls on the table in front of you, overlapping. Draw what you see. Make sure to notice the objects' placement, shadows, and shading. (This would be best done at night with a lamp on near by rather than an over head light- try it out and see what works best for you).
Here is another example of how you can use this drawing skill when drawing real life objects...

If you have the time and you want to challenge yourself, why not have a look around your home and see if you can find something similar to draw i your sketchbook next to all your other overlapping spheres!
Lesson 3- Advanced Level Spheres
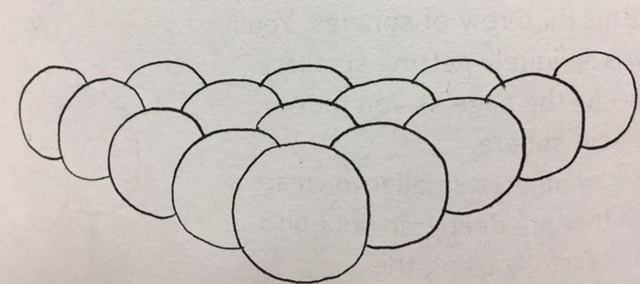
1) Look at the drawing above. Looks fun? Complicated? Difficult? It's actually very easy when drawn one circle at a time. It's like building a Lego tower, one bumpy little brick at a time. Start with your first circle.
2) Draw another circle behind the first. Push it up a bit (placement). Tuck it behind the first (overlapping). Draw it a bit smaller (size). Yes, you've done this before!
3) Draw the next circle over to the right behind the first one, push it up, tuck it behind, and draw it a bit smaller than the first circle.
4) Onward into the third row of spheres. You'll notice this row is definitely getting smaller and much higher on the page as you move away from the front sphere.
When you draw objects smaller to create the illusion that they are deeper in your picture, you are successfully using the fundamental drawing law of size. As you draw this next row of spheres, you need to draw them a bit smaller than the row in front. Size is a powerful tool to create depth.
5) Fill in the far gap with a peeking over- the- top sphere. Remember that smaller equals deeper. This is also a great example of the potency of overlapping. By drawing a simple curved line "peeking" from behind, you effectively create a three- dimensional illusion, and you haven't even begun to add shadows, shading, or blending. Overlapping is an awesome, powerful tool to understand.
6) Complete the third row with the end sphere smaller, higher, and behind. Are you beginning to notice a recurring mantra here?
7) Draw the fourth and fifth row of spheres. Pushing each row deeper into your picture with size, placement, and overlapping. We haven't even begun to shade the drawing, and yet it is already starting to pop off the paper in 3-D.
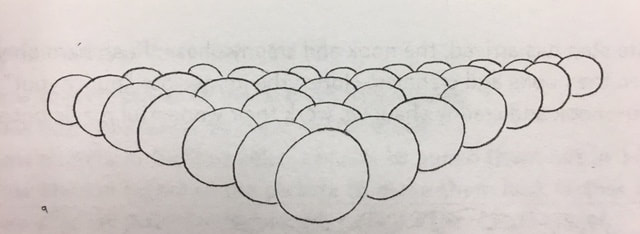
8) Go ahead, go crazy, go wild- draw rows six and seven really receding into the depths of your sketch book page. Size really kicks in on these distant rows. You can definitely see the size difference between the front sphere and the back row. Even though the spheres are all the same size in our imagination, we have created the successful illusion that they are receding far away into the sunset.
9) You can do as many rows as you like after this. I lost sight of the spheres at row nine here. What a great visual treat. This mob of spheres looks very three- dimensional, and we haven't even determined the light source yet. You can see how powerful these concepts are: Size, placement, and overlapping create effective depth all on their own.
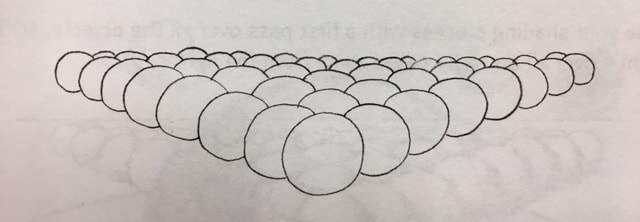
10) Finally, we get to determine the position of our light source. For consistency we will keep the light positioned in the top right. You can mess around with this light position on your own. Try experimenting with this mob of spheres with the light source postponed directly above or over in the top left. If you want to try something really challenging, position the light source from within the sphere mob, making one of the middle orbs glowing hot bright. We will get into moving the light source position around in later lessons. Go ahead and toss some cast shadows off to the left, on the ground, opposite your light source position. Now, draw the horizontal background reference line; this is called the horizon line" The horizon line will help you create the illusion of depth in your drawing.
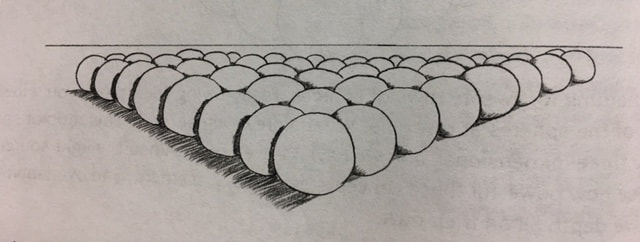
11) Now for the nook and cranny phase. Push hard on your pencil, and darken those nooks and crannies. Notice the immediate "punch-out" visual effect. Wham- nook and cranny shadows work their wonderful magic once again.
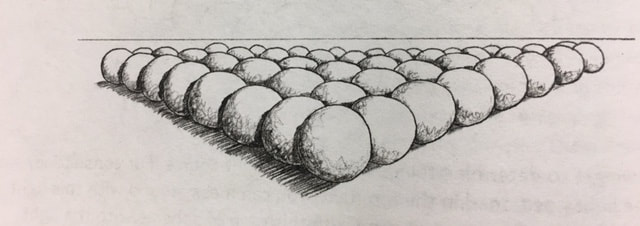
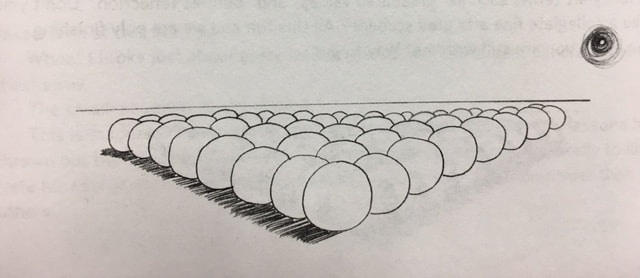
12) Continue your shading process with first pass over all the objects, scribbling the shading lightly over all opposite edges away from the light source.
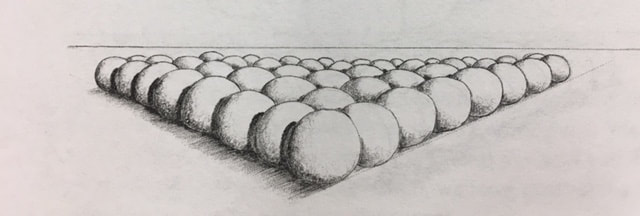
13) Make several more scribble shading passes. With each consecutive pass, darken the edges farthest away from your light source while scribbling lighter and fainter as you move towards the light source. Blend the shading with your finger. Carefully smudge the dark shaded areas up towards the hot spots, lighter and lighter as you go. Erase the excess pencil lines to clean up (if you want to). Dab the hot spots with your eraser, and watch what happens. Pretty cool, eh? The spots you dab with your eraser will create a very distinct, easily identified hot spot. Now we are getting into some fancy art terms such as "graduated values" and defined reflection".
In three lessons you have learnt a lot:
- Draw objects larger to make them look closer.
- Draw objects smaller to make them recede.
- Draw objects in front of other objects to punch them out in 3-D.
- Draw objects higher in the picture to make them look farther away.
- Draw objects lower in the picture to make them look closer.
- Shade objects opposite the light source.
- Blend the shading on round objects from dark to light.
Extra Challenge
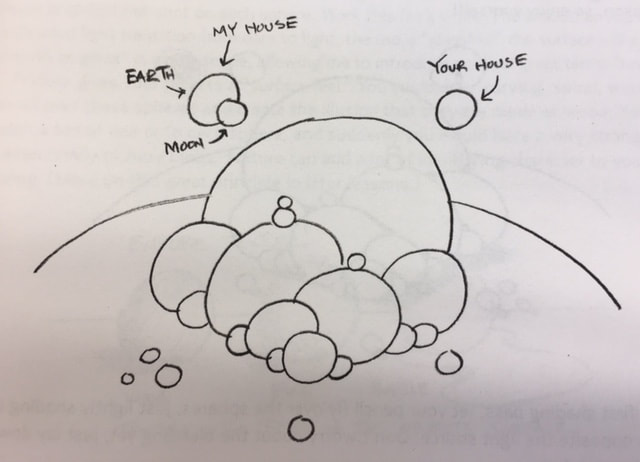
Take a look at this drawing. It breaks almost every lesson rule so far! The largest sphere is the farthest away. The smallest sphere is the closest. This is madness!
Has everything you have learnt over the past few lessons been shown out of the window? Absolutely not. This drawing is here to specifically illustrate how some of the drawing laws hold much more visual illusion power than others.
Each of the drawing laws has varying power over other drawing laws... If you draw a smaller object in front of any other object, even a Jupiter-sized planet, overlapping will prove to be all powerful and will prevail in appearing to be the closest. Some drawing laws have more visual power than others, depending on how you apply them.
Look at the drawing above again. Even though the farthest, deepest sphere is the largest, the smaller spheres overlap it, thus trumping the visual power of size. Overlapping is always more powerful than size.
Look at the drawing again. See the nearest sphere is drawn the smallest. Typically this would mean it would appear the farthest away. However, because it is isolated and placed lowest on the paper, it appears closest. Simply states, placement trumped both size and overlapping.
I do not intend for you to commit these visual power variations to memory. These fun freaky wrinkles in the rules will naturally absorb into your skill bank as you practice.

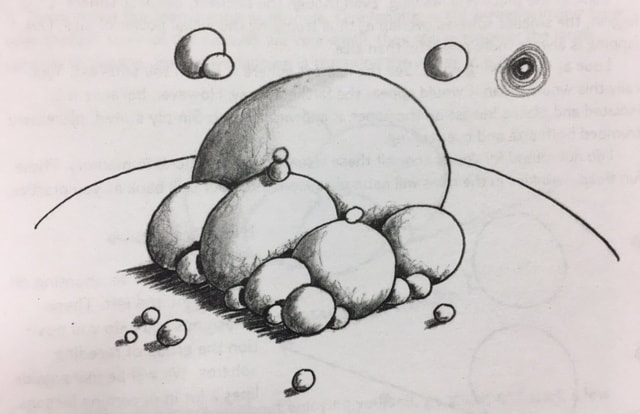
1) Draw a circle.
2) Draw guide lines shooting off to the right and left. These guide lines will help you position the group of receding spheres. We will be using guide lines a lot in upcoming lessons. Draw these guide lines at just a slight angle upward, not too steep.
3) Using your guide lines, position a few more spheres behind your first. Draw the tiny one peeking out the same as it is on drawing 3. Notice how the guide lines are used to position the spheres?
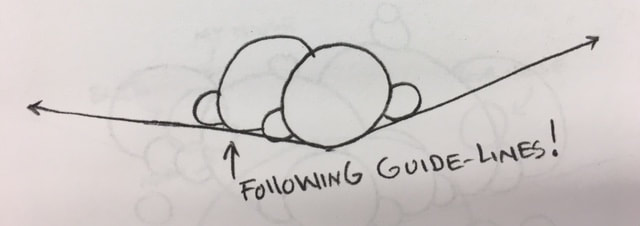
4) Continue to use your guide lines as a reference, and draw a few more spheres, varying the sizes. Notice how the guide lines help you place the spheres higher up in proper position (placement).
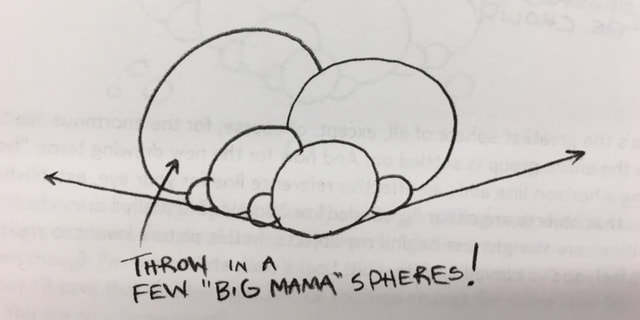
5) Throw some Big Mama spheres in there. Overlapping is the power principle here; even though some of the spheres are very small, they still overpower the larger spheres to appear closer. Overlapping is trumping the power of size!
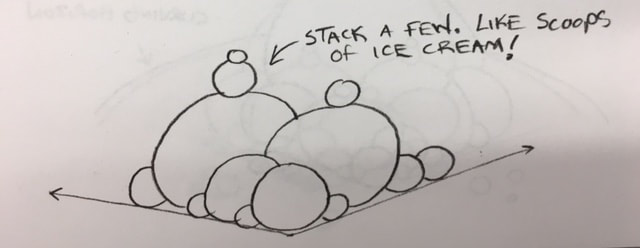
6) Because this drawing is all about enjoying yourself, go ahead and stack a few spheres on top.
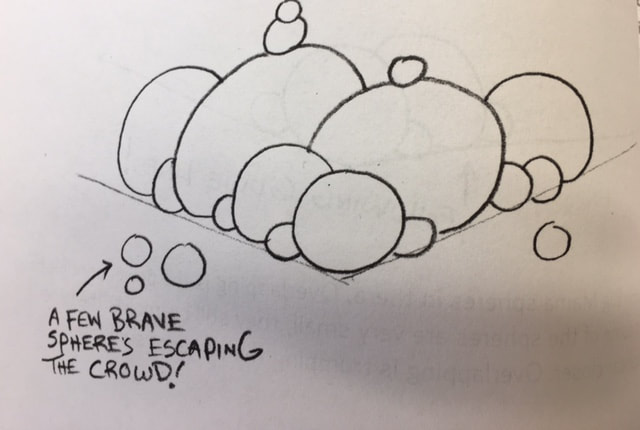
7) Some of the spheres are breaking from the pack, seeking a less crowded, less congested life. Brave solitary spheres are establishing the first rural outposts...

8) Here's the greatest sphere of all, except, of course, for the enormous Jupiter- size sphere the entire group is settled on. And now for the new drawing term: "horizon." Drawing a horizon line adds an effective reference line for your eye, establishing the illusion that objects are either "grounded" or "floating." Usually I draw the horizon line with a very straight line behind my objects. In this picture, the horizon line is curved to give the feeling of the group of spheres being sat on top of a larger planet sphere.
9) Go ahead and draw a few more planets in orbit above the sphere pile. Take this idea of "adding extras" as far as you want. Go ahead and draw a row of thirty-seven planets in the sky overlapping down to the horizon if you want to!
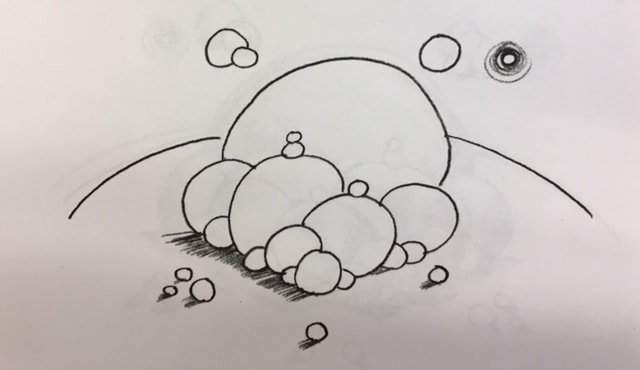
10) Identify the position of your light source, and begin adding cast shadows opposite your light position. For consistency we will keep the light source positioned in the top right in the example. You can change this in your drawing if you want to though!
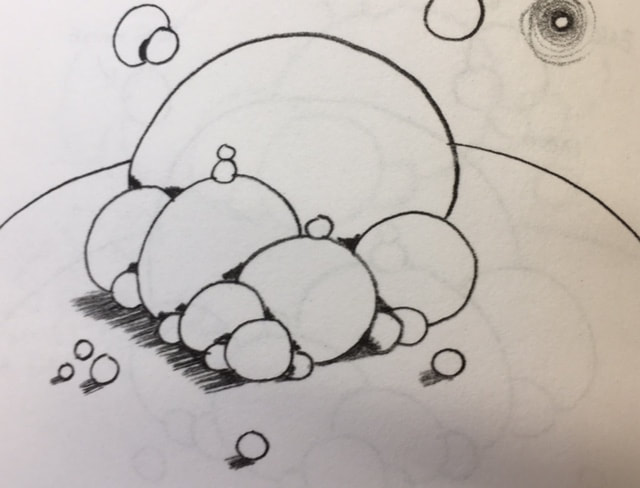
11) This nook and cranny step will take some thinking. Keep darting your eye between your light position and the objects you are shading. Put some pressure on your pencil, and get a really nice dark shadow into all the nooks and crannies. Take your time; this is a fun step in the lesson, so enjoy yourself!
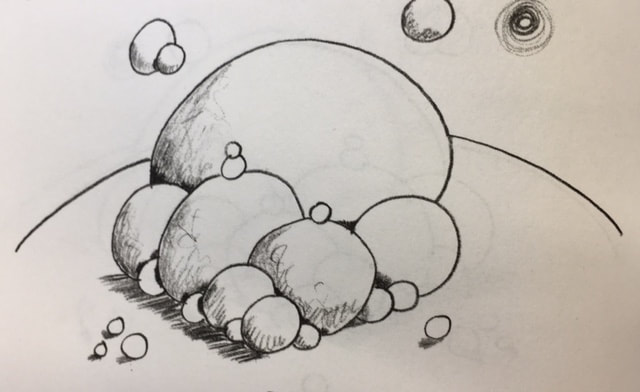
12) On the first shading pass, let your pencil fly over the spheres, just lightly shading the large areas opposite the light source. Don't worry about the blending yet; just lay down a base layer to work from.
Make several more shading passes over all the spheres. Really work the dark edges, the dark nook and crannies, and the dark spaces on the ground between the spheres and the cast shadow. Work the blending slowly up towards the light. Constantly dart your eyes back to confirm the position of your light source. Take your time, work this well, and enjoy the exhilarating punch-out effect you are creating.
Make several more shading passes over all the spheres. Really work the dark edges, the dark nook and crannies, and the dark spaces on the ground between the spheres and the cast shadow. Work the blending slowly up towards the light. Constantly dart your eyes back to confirm the position of your light source. Take your time, work this well, and enjoy the exhilarating punch-out effect you are creating.
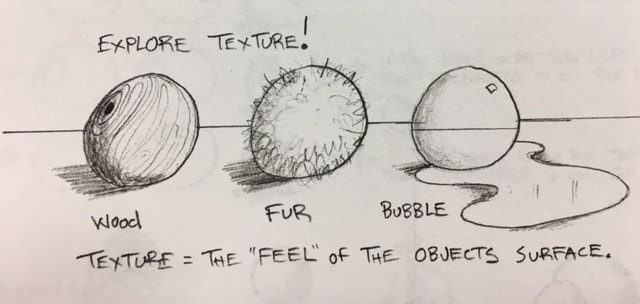
13) Blend your shading as smooth as glass. Use controlled, careful pressure to smudge and smear the shading, blending it lighter and lighter from the darkest dark edges to the lightest brightest hot spot on each sphere. Work this for a while. The smoother you make the blended light transition fro dark to light, the more "glasslike" the surface will appear. "Smooth as glass" is a nice segue, allowing me to introduce another term: "texture."
Texture gives your objects a "surface feel." You could draw curving, spiral, wood-grain lines all over these spheres and create the illusion that they are made of wood. You could scratch a ton of hair onto each sphere, and suddenly you would have a very strange looking alien family of furry blobs. Texture can add a lot of identifying character to your drawing. (More on this great principle in later lessons.)
Texture gives your objects a "surface feel." You could draw curving, spiral, wood-grain lines all over these spheres and create the illusion that they are made of wood. You could scratch a ton of hair onto each sphere, and suddenly you would have a very strange looking alien family of furry blobs. Texture can add a lot of identifying character to your drawing. (More on this great principle in later lessons.)
14) Adding extras to your drawing adds another layer to your learning. I can and will teach you the specific skills you need to create technically accurate three- dimensional drawings. However, the real learning, the real fun, the true enjoyment of drawing comes from you internalising the skills and externalising your creative imagination.
I can teach you how to draw, easy, no problem. The fun part is how you launch from this starting point by practicing, practicing, practicing... all the while adding, adding, adding tons of your own brilliant creative imaginative extras.
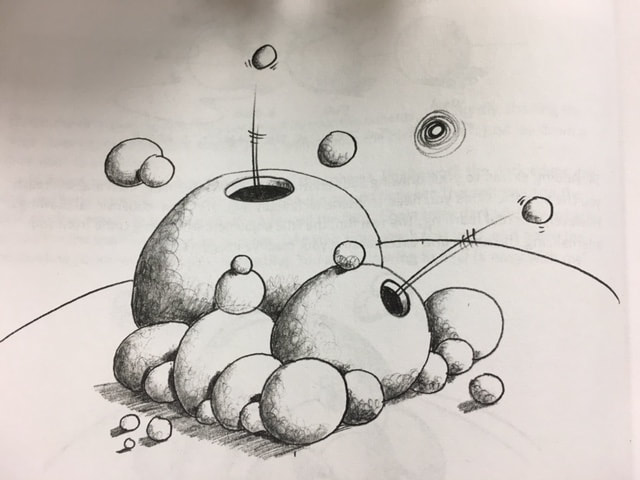
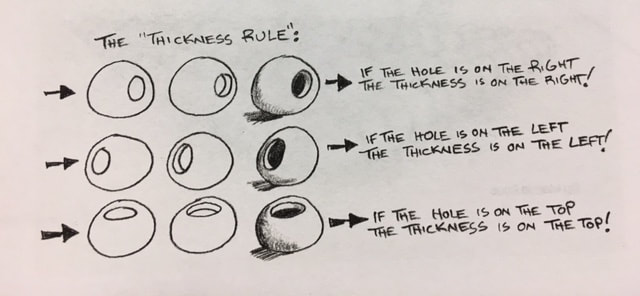
Try drawing a few holes in the larger spheres. Holes and windows are great practice exercises for learning how to draw thickness correctly. Here is an easy way to remember where to draw the thickness on windows, doors, holes, cracks, and openings:
Basically, have some fun with it and experiment!
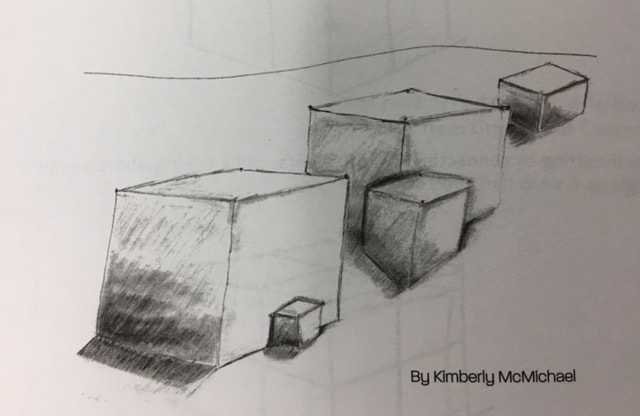
Lesson 4- The cube
The cube is so versatile that you will be using it to draw boxes, houses, buildings, bridges, aeroplanes, vehicles, flowers, fish...fish? Yes, a cube will even help you draw a fish in 3-D. Along with helping you draw faces, flowers, and, well, just about anything you can think of or see in the world around you. So let's draw a cube.
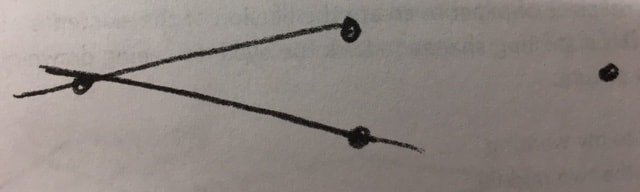
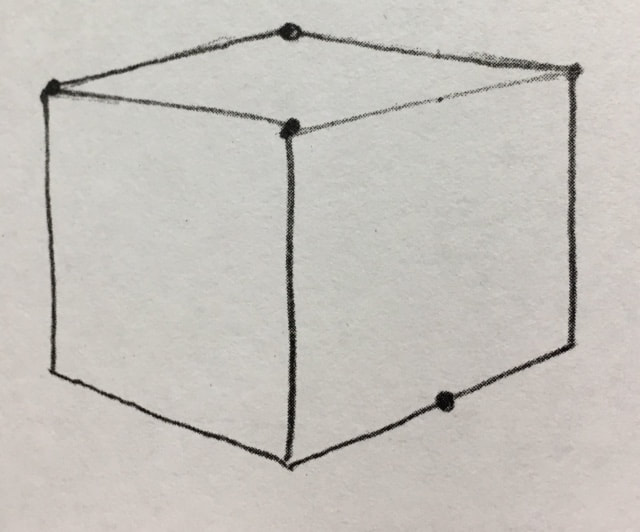
1) Start on a fresh page in your sketchbook, write the lesson till and the short date at the top. Then draw two dots across from each other.
. .
1) Start on a fresh page in your sketchbook, write the lesson till and the short date at the top. Then draw two dots across from each other.
. .
2) Place your finger between the dots using the opposite hand from what you are drawing with. Then draw a dot above your finger as shown below-
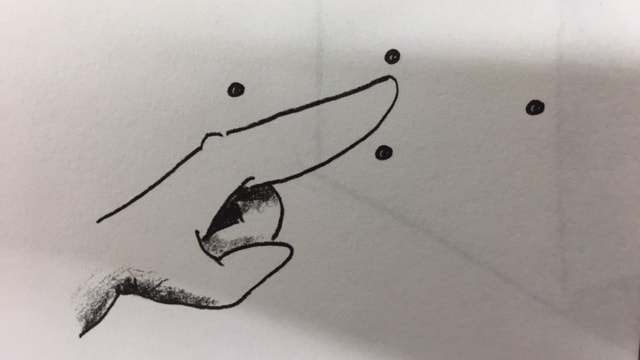
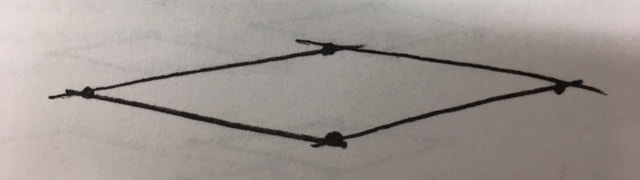
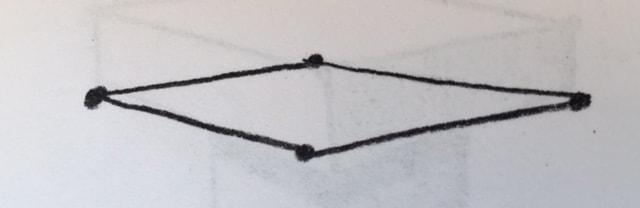
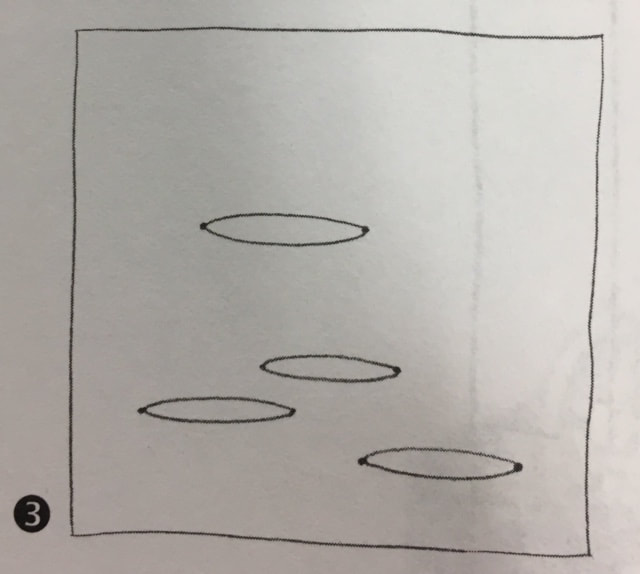
3) Look at the dots you have drawn. Try to keep these two new dots really close together. We are about to draw a "foreshortened" square.
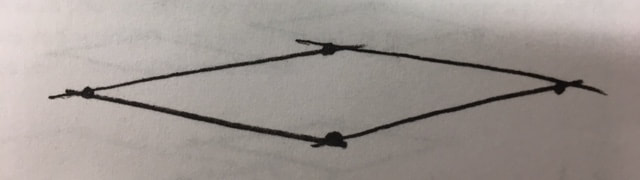
4) Shoot the first line across.
5) Draw the next line.
6) Add the third line.
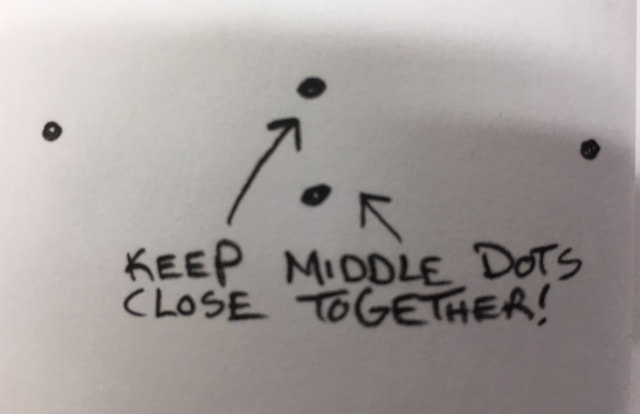
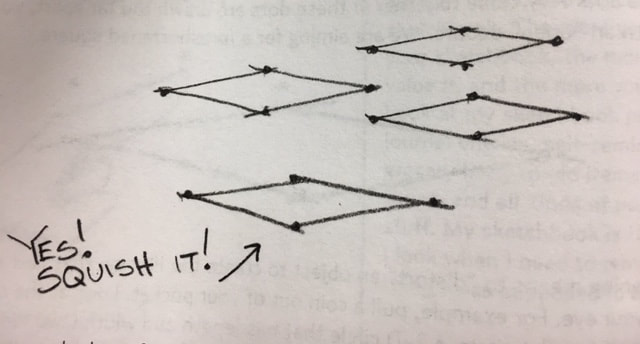
7) Complete the foreshortened square. This is a very important shape to practice. Go ahead and draw this foreshortened square a few more times. WARNING: Drawn the two middle dots very close together. If these dots are drawn too far apart, you will end up with an "open" square. We are aiming for a foreshortened square.
Foreshortening means to "distort" an object to create the illusion that part of it is closer to your eye. For example, pull a coin out of your pocket. Look at the coin straight on. It is a flat circle, a 2-D circle that has length and width (two dimensions) but lacks depth. The surface is at an equal distance from your eye. Now, tilt the coin slightly. The shape has changed to a foreshortened circle, a circle that has depth. The coin now has all three dimensions: length, width and depth. By tilting the coin slightly, you have shifted one edge farther away form your eye; you have foreshortened the shape. You have distorted the shape.
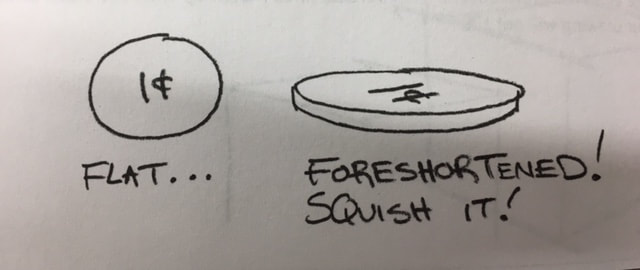
This is basically what drawing in 3D boils down to, distorting images on a flat two- dimensional piece of paper to create the illusion of the existence of depth. Drawing in 3-D is distorting shapes to trick the eye into seeing drawn objects near and far in your picture.
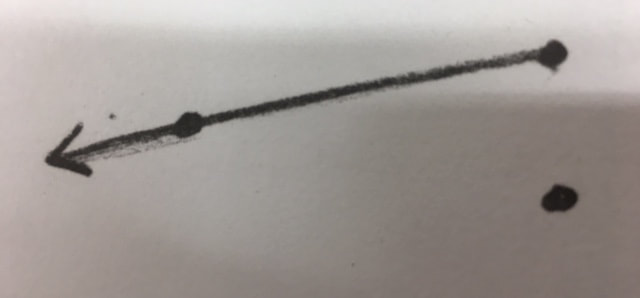
Now, back to my warning about drawing the two middle dots too far apart. If your dots are too far apart, your foreshortened square will look like this.
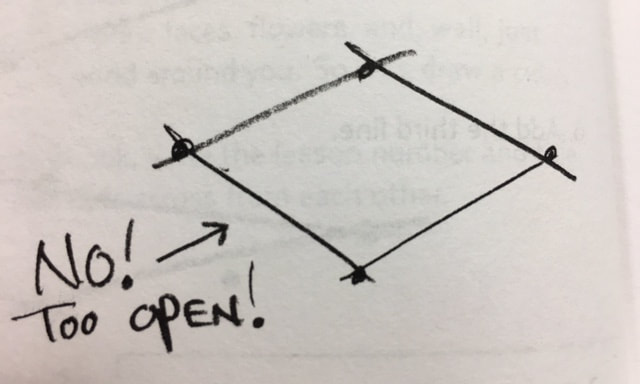
If your foreshortened square looks like the open square I just mentioned, redraw it a few more time, placing the middle dots closed together, until your shape looks like this.
Okay, enough about foreshortening for now. Keep this concept in mind; it is so important that just about every lesson this unit will begin with it.
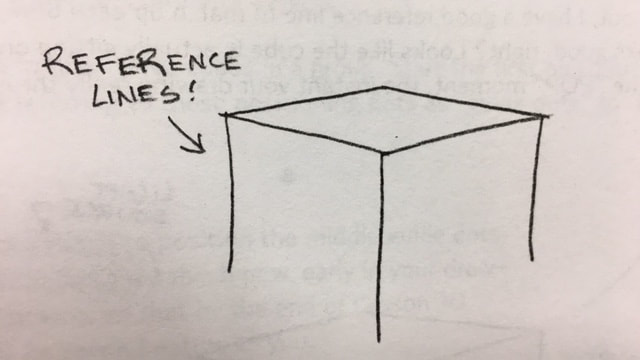
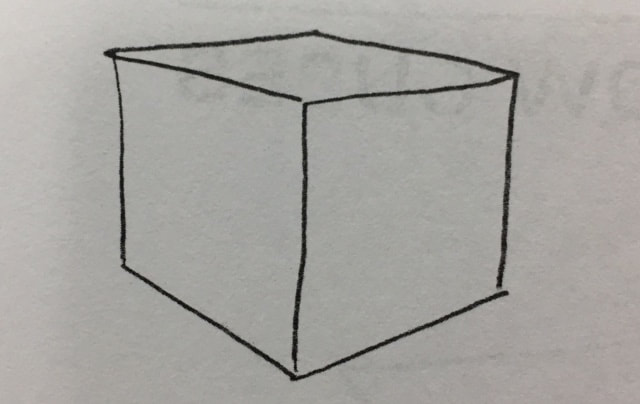
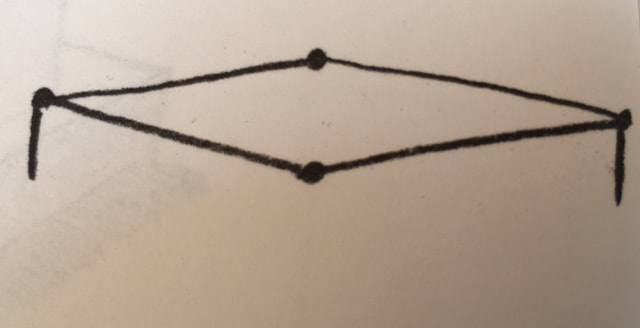
8) Draw the sides of the cube with two vertical lines. Vertical, straight-up-and-down lines will keep your drawings from "tilting." Here's a tip: Use the side of your sketchbook page as a visual reference. If your vertical lines match up with the sides of the page, your drawing will not tilt.

9) Using the two side lines you have just drawn as reference lines, draw the middle line a bit longer and lower. Using lines you have already drawn to establish angles and positions for your next lines you have already drawn to establish angles and positions for your next lines is a crucial technique in creating a 3-D picture.

10) Using the top right edge of the top foreshortened square as a reference line, draw the bottom right side of the cube. It's a good idea to shoot this line across in a quick dashing stroke while keeping your eye on the top line. It's perfectly okay to overshoot the line as you can clean up your drawing later. I prefer a picture that has a lot of extra lines and scribbles that looks 3-D, rather than a picture that has super clean precise lines yet looks wobbly and tilted.
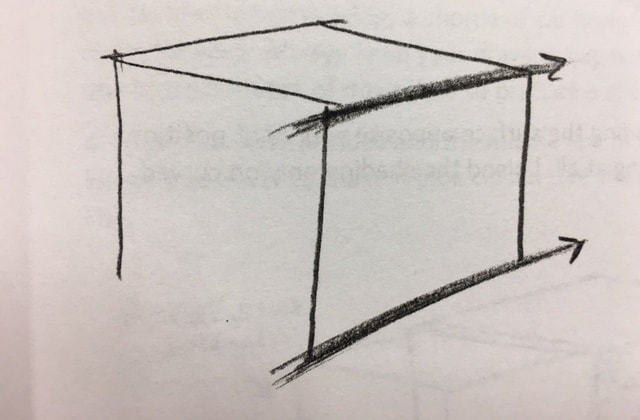
11) Now draw the bottom left side of the cube by referring to the angle of the line above it. Reference lines! Reference lines! Reference lines! Can you tell that I'm strongly urging you to practice using reference lines?
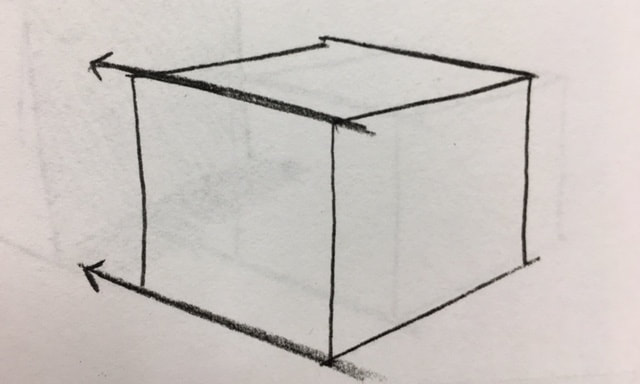
12) Now on to the fun part, the shading. Establish the position of your imaginary light source. The example below has a light source in the top right position. Check this out. The image below is using a reference line to correctly angle the cast shadow away from the cube. By extending the bottom right line out. Now there is a good reference line to match up each drawn line of the cast shadow. Looks good, right? Looks like the cube is actually sitting on the ground? This is the "POP" moment, the instant your drawing really thrusts off the flat surface.
13) Complete your first 3-D cube by shading the surface opposite your light position. Notice that the example does not blend the shading at all. You only blend the shading on curved surfaces.
Bonus Challenge
Lets take what we learned in drawing the basic 3-D cube and add details that enhance and identify the cube as three different objects.
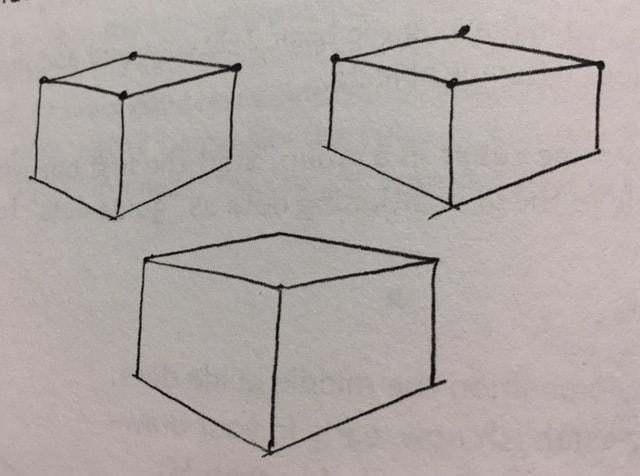
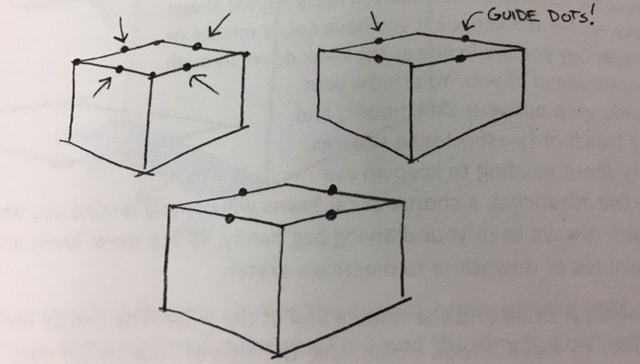
1) We are going to draw three cubes in a group. Start the first one with your two guide dots. I'm going to be referring to these positioning dots as "guide dots" from now on.
. .
1) We are going to draw three cubes in a group. Start the first one with your two guide dots. I'm going to be referring to these positioning dots as "guide dots" from now on.
. .
2) Use your index finger to position the middle guide dots. This is a terrific habit to establish now, early in your drawing skill development, so that by the end of lesson 30 using them will be second nature to you.

3) Connect the foreshortened square. This is a great shape to practice in your sketchbook if you have only a minute or so to doodle.
4) Draw the vertical sides and the middle line of the cube. The middle line is always drawn longer and lower to make it look closer. Use the side of your sketchbook page as your reference line.
5) Complete the cube using the top lines as reference lines.

6) Go ahead and draw three cubes like the example below:
7) Draw guide dots in the middle of each side of the top foreshortened squares.
8) Let's take this one cube at a time. On the first cube, let's draw an old fashioned gift- wrapped postal package. Shoot a vertical line down from the near left guide dot; then draw it across the top of the other guide dot.
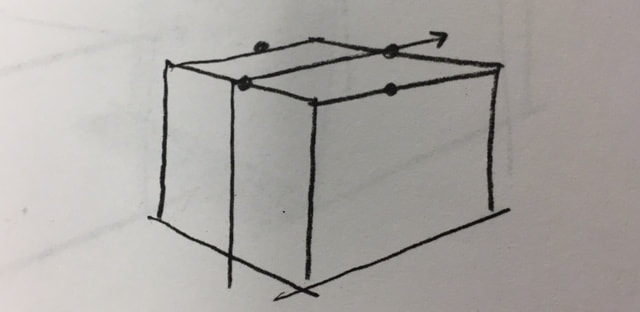
9) Repeat this on the other side. Look at how you have forced the string to flatten across the top. The guide dots helped you draw the string inside of a foreshortened boundary. Guide dots are extremely helpful in lining angles up like this. You'll see how often we use guide dots in the upcoming lessons (a lot!).
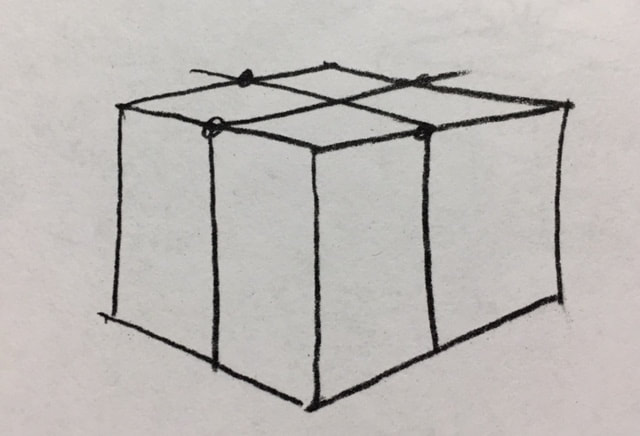
10) To draw string wrapping around the sides of the package, use guide dots once again to position the angles. Draw guide dots halfway down each vertical edge.
11) Draw the string by connecting the guide dots, using the line above as your reference line.
12) With this basic string wrap, you can finish all three cubes into a package, a cube game, and a gift wrapped in a thick ribbon.
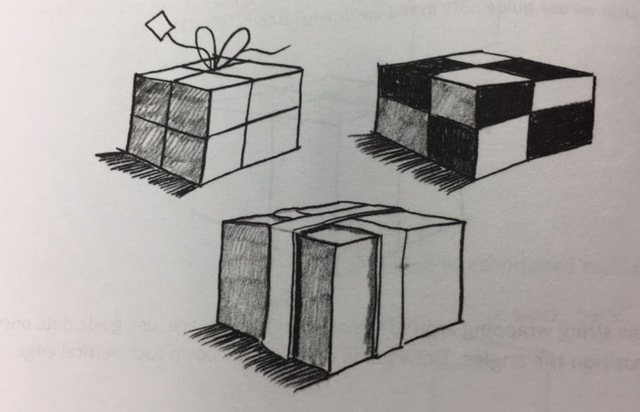
Go ahead and have some fun: Try drawing a group of five cube games each overlapping the other, like you did with the five spheres!
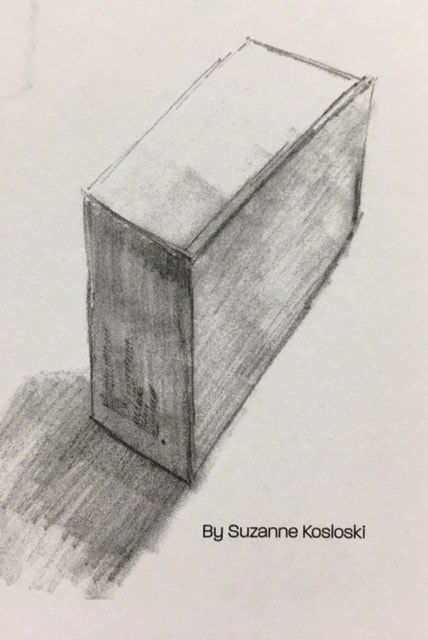
Place a shoebox or a cereal box or any kind of box on the table in front of you.
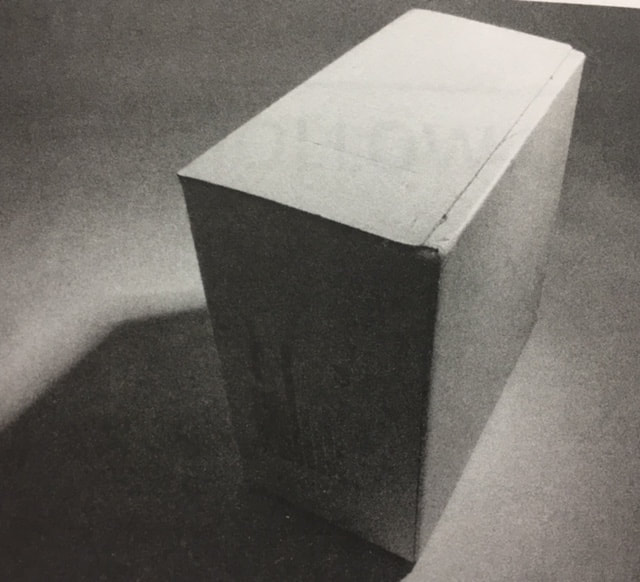
Sit down and position yourself so that you can see the foreshortened top of the box, similar to the foreshortened shapes you have just drawn in this lesson. Now draw the box sitting in front of you.
Don't panic! Just remember what you learned in this lesson, and let this knowledge of foreshortened squares help your hand to draw what your eyes are seeing. Look, really look, at the foreshortened angles, the shading, and the cast shadow. Look at how the lettering on the box follows the foreshortened angles at the top and bottom of the box. The more you draw, the more you will really begin to see the fascinating details in the real world around you.
Don't panic! Just remember what you learned in this lesson, and let this knowledge of foreshortened squares help your hand to draw what your eyes are seeing. Look, really look, at the foreshortened angles, the shading, and the cast shadow. Look at how the lettering on the box follows the foreshortened angles at the top and bottom of the box. The more you draw, the more you will really begin to see the fascinating details in the real world around you.
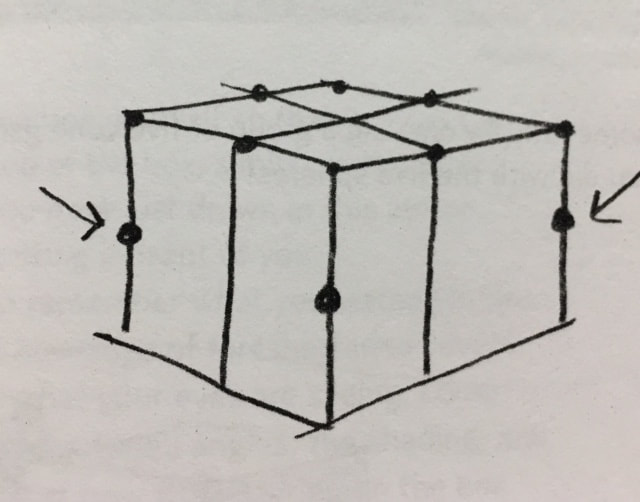
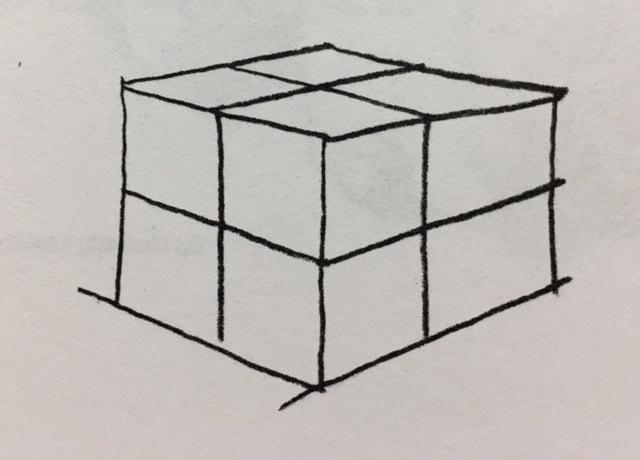
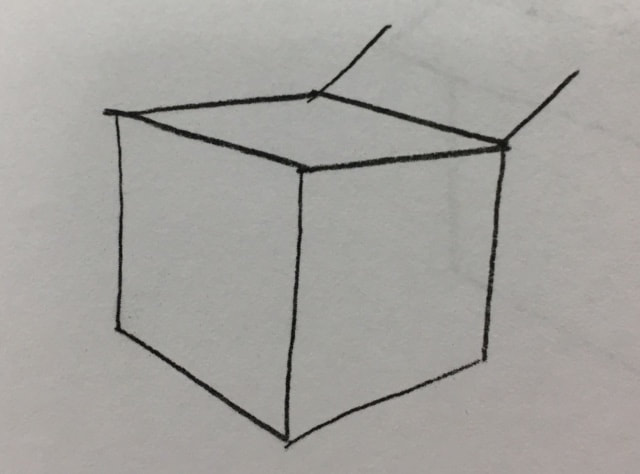
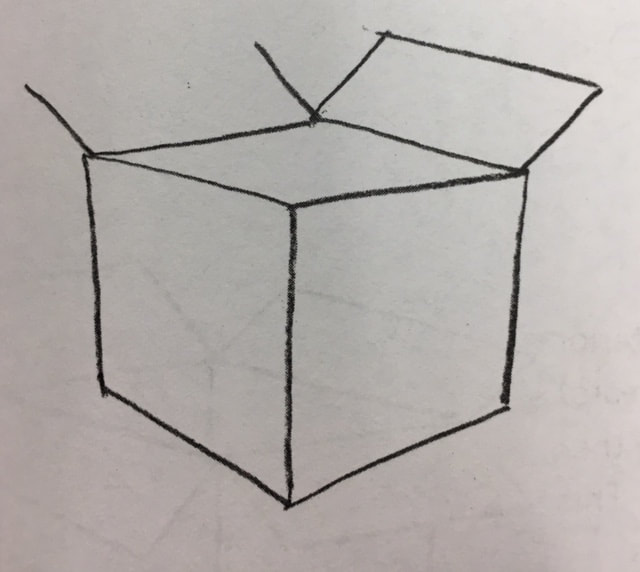
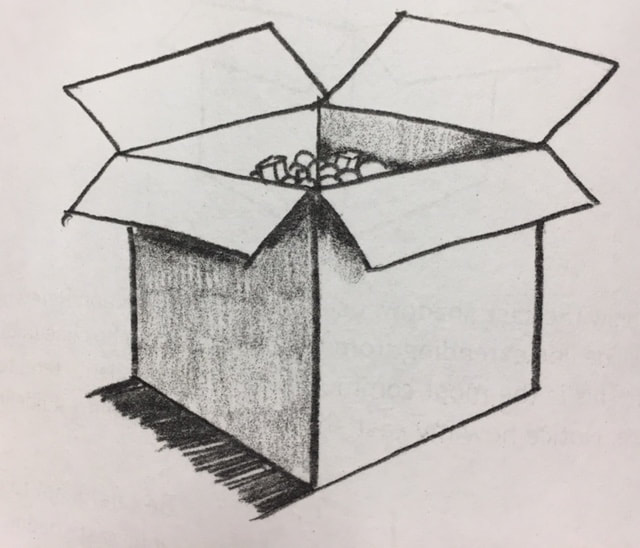
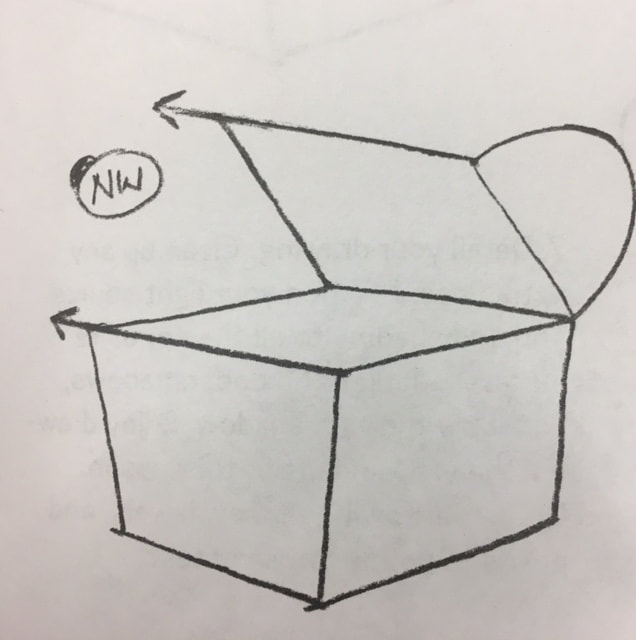
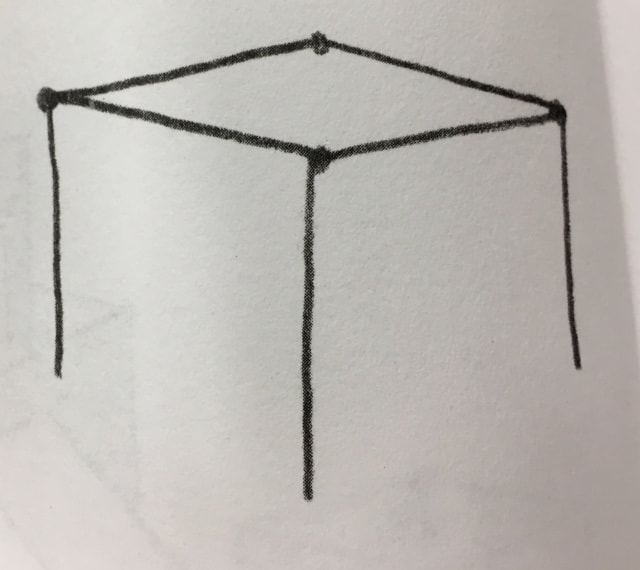
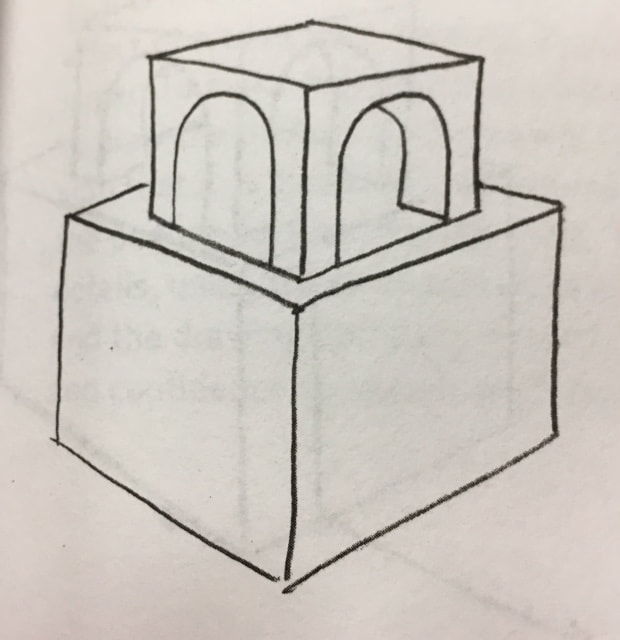
Lesson 5- Hollow Cubes
To teach you how to really feel like you are gaining control over that daunting flat piece of paper, I want to explore the challenging fun of hollow boxes and cubes.
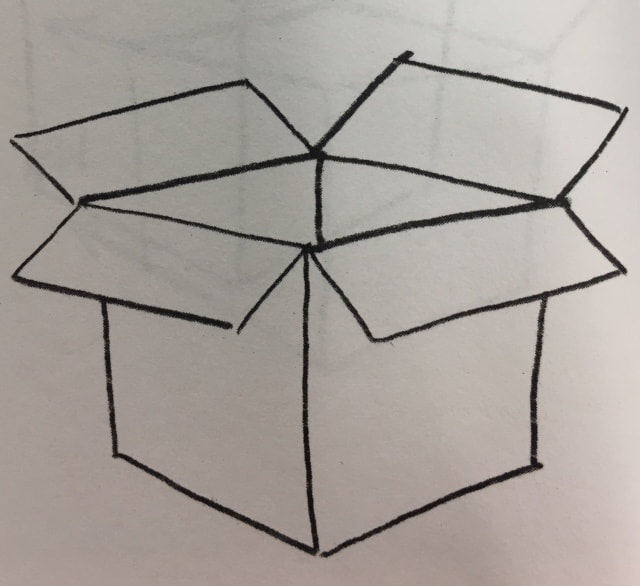
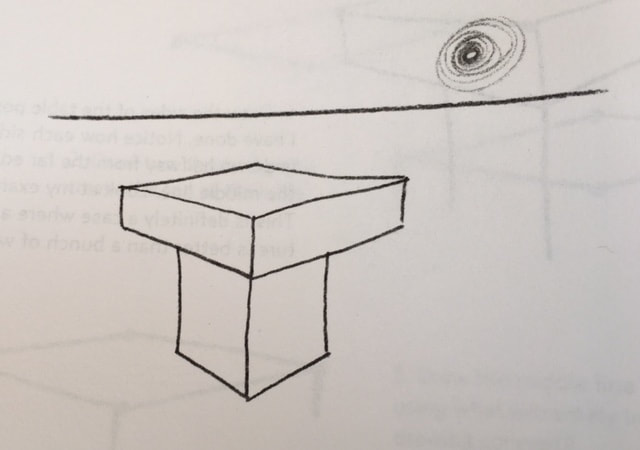
1) Go ahead and lightly sketch in the cube.
1) Go ahead and lightly sketch in the cube.
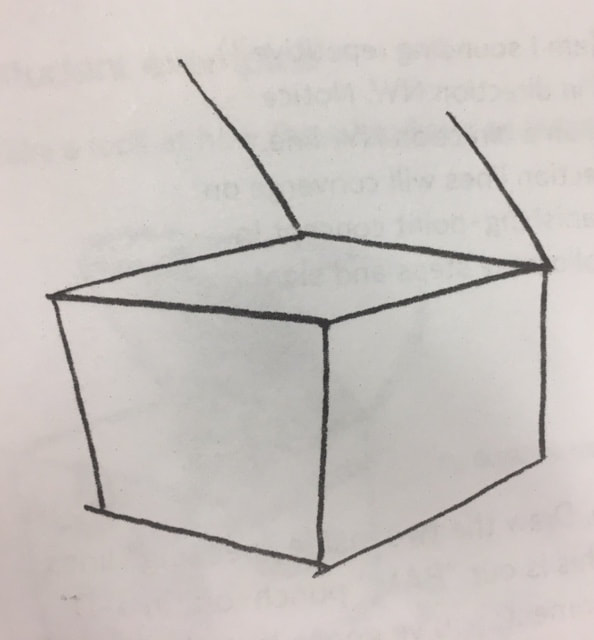
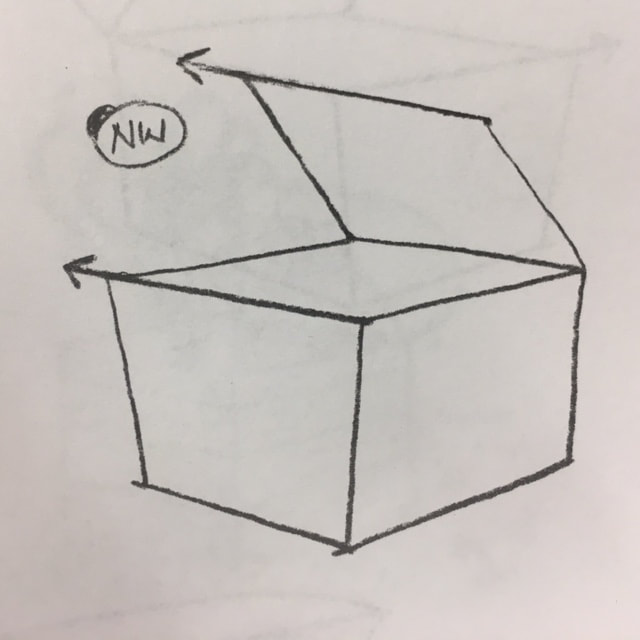
2) Slant back two parallel lines.
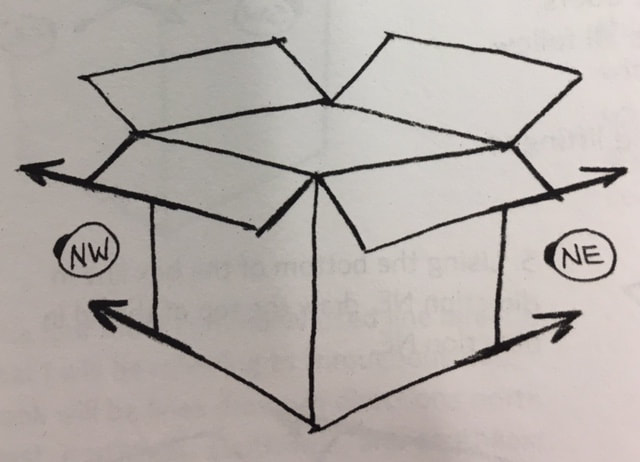
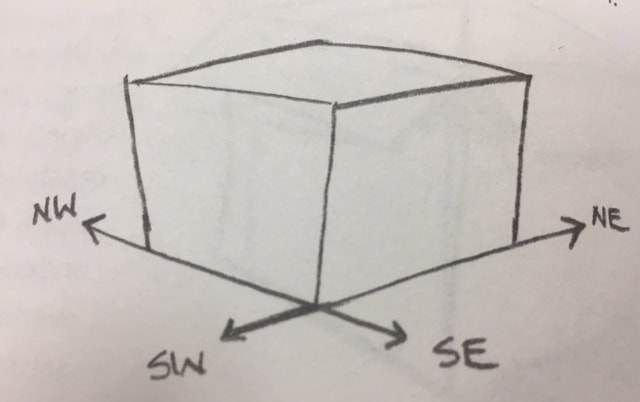
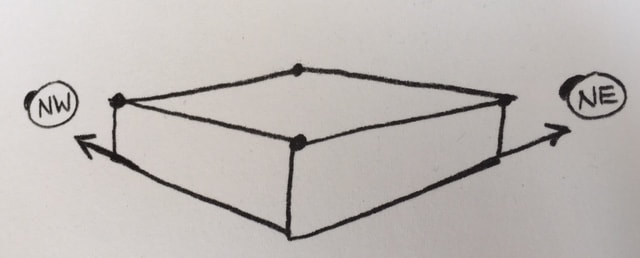
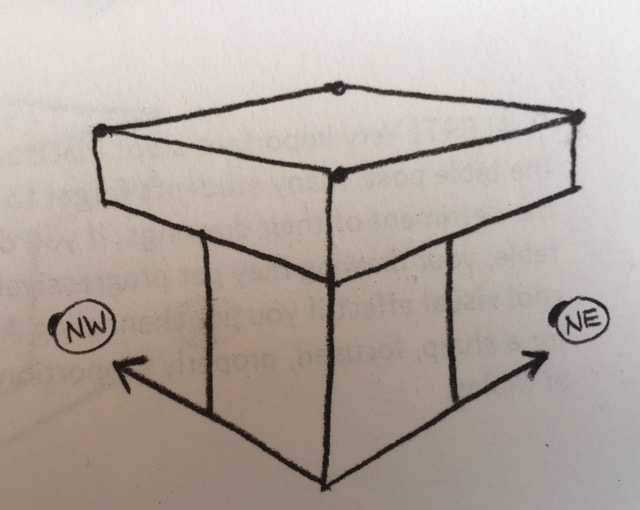
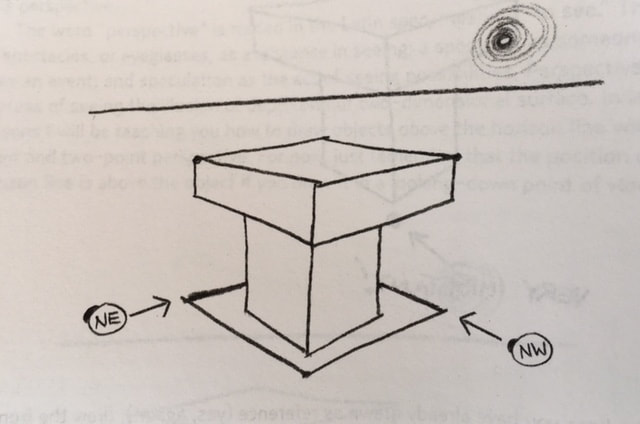
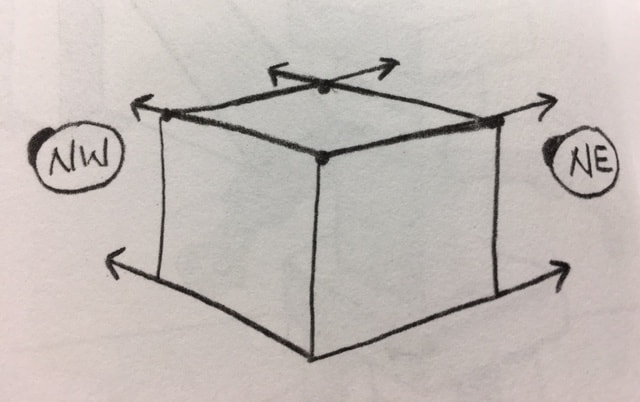
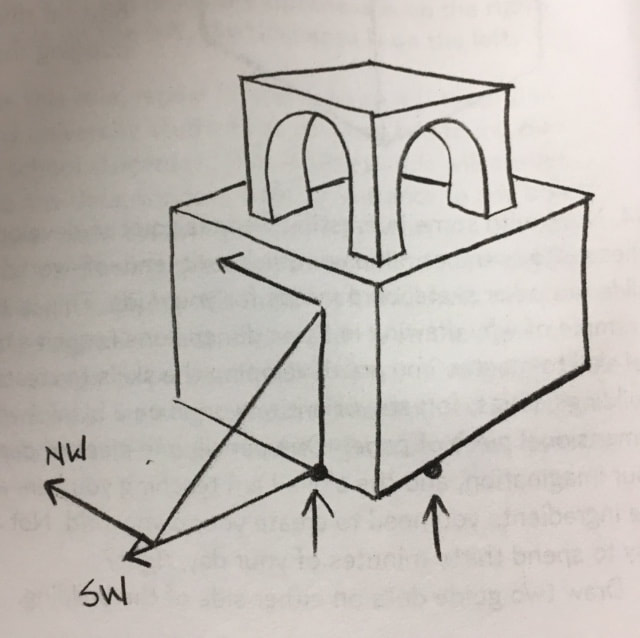
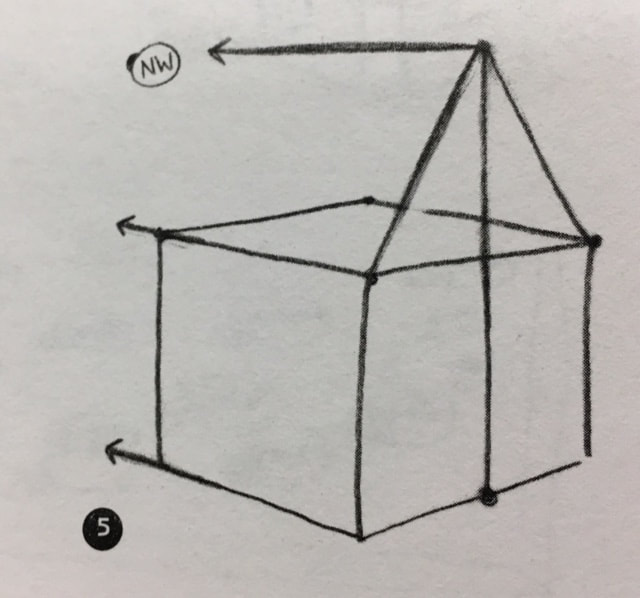
3) Alignment alert! Look how the example has the top edge of the box lid in alignment with all of the angled lines slanting slightly up to the left. I'm going to refer to this angle as direction northwest. Think of a compass.
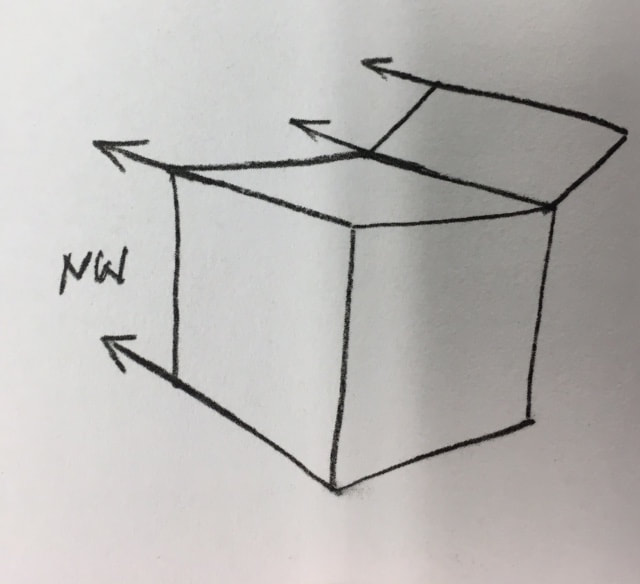
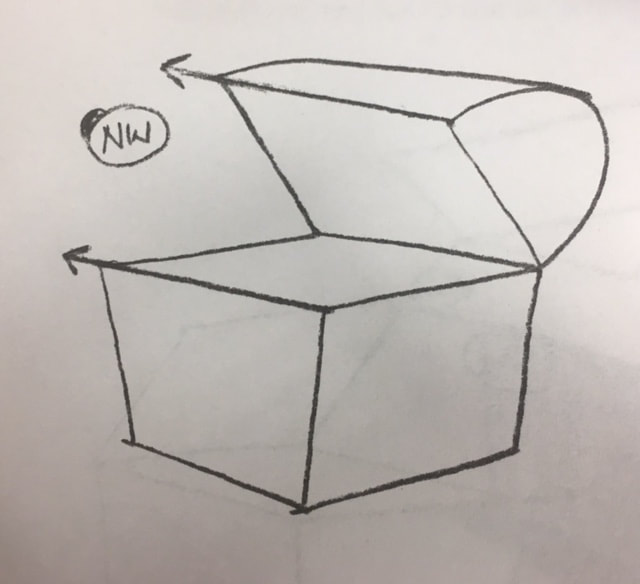
The four most commonly used line directions that I will be referring to throughout this unit will be lines drawn in directions northwest, northeast, southwest, and southeast.
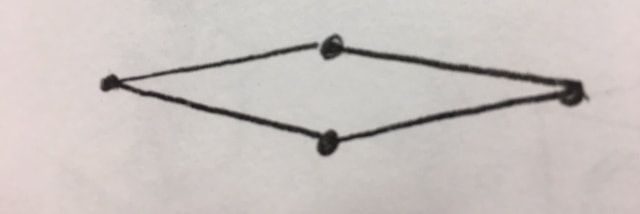
Take a look at this compass.
Take a look at this compass.
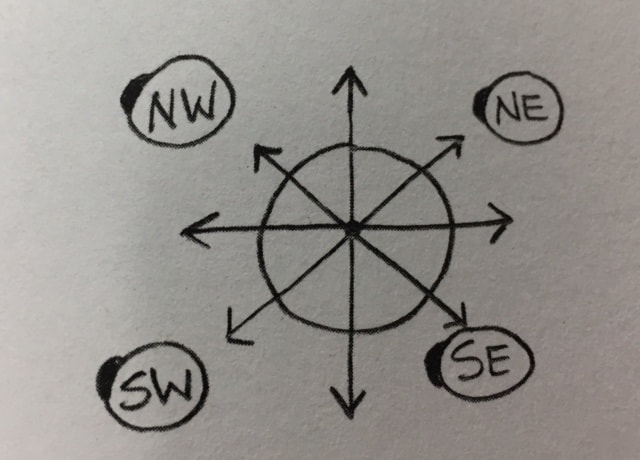
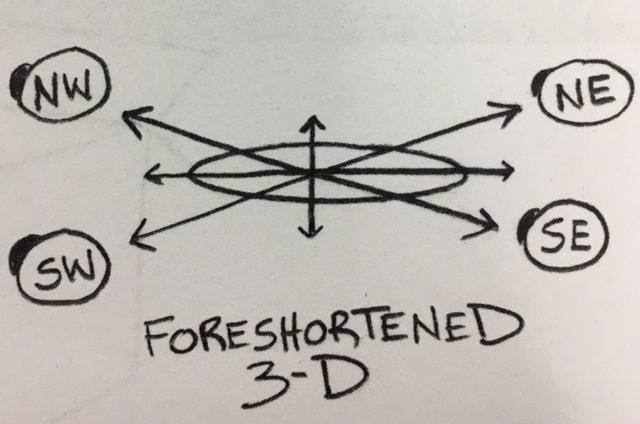
Now, lets foreshorten the compass. As you recall, foreshortening is distorting or squishing an object to create the illusion of depth, to make one edge of the object appear closer to your eye.
Notice in this foreshortened compass illustration that the four directions- NW, NE, SW and SE- all line up with the lines you already used to draw your cube.
Notice in this foreshortened compass illustration that the four directions- NW, NE, SW and SE- all line up with the lines you already used to draw your cube.
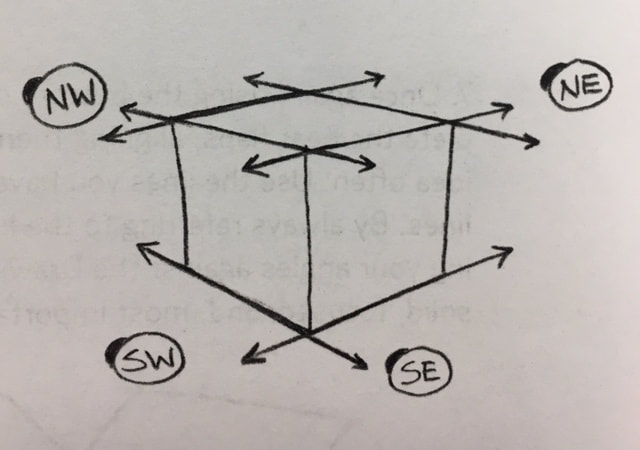
I call this the "Drawing Direction Reference Cube." This is a wonderful tool to help you position your lines consistency in proper alignment. Without consistency in your angles, your drawing will "droop" or look askew. Dr. Seuss achieved world acclaim for his signature style of drooping, melting, Play-Doh-ish characters, buildings, objects, and environments. However, in his work, Dr. Seuss still maintained consistent drawing compass angles. Good examples of this are in his book 'The Lorax.' Turn to any page in 'The Lorax,' and hold up the Drawing Direction Reference Cube to the illustration. You will discover that his buildings, windows, doors, pathways, vehicles, and characters all follow these four important positions.
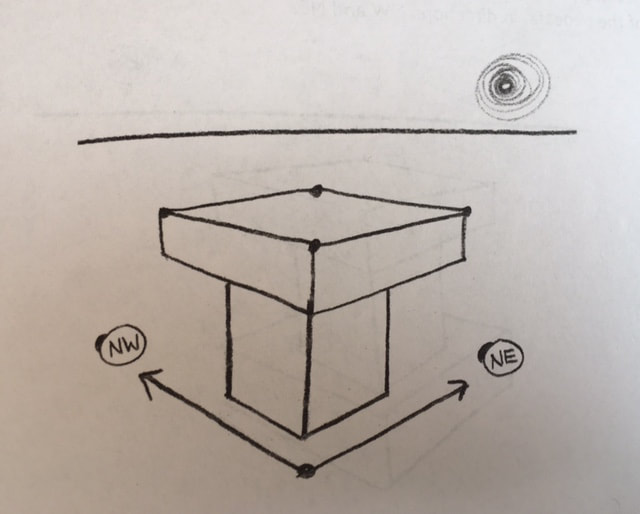
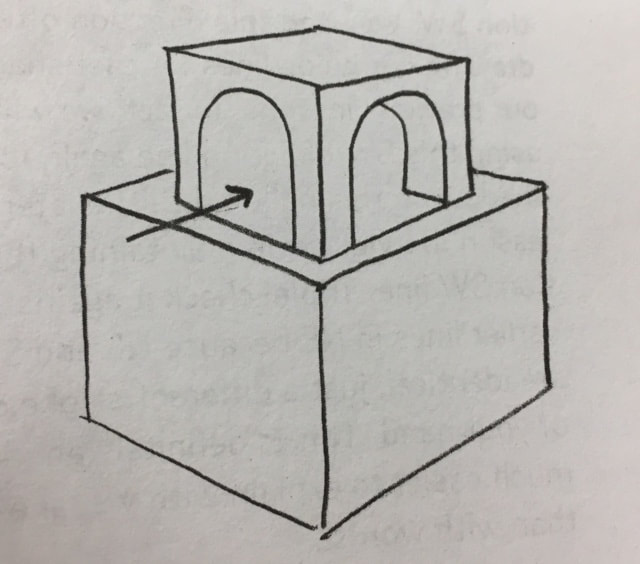
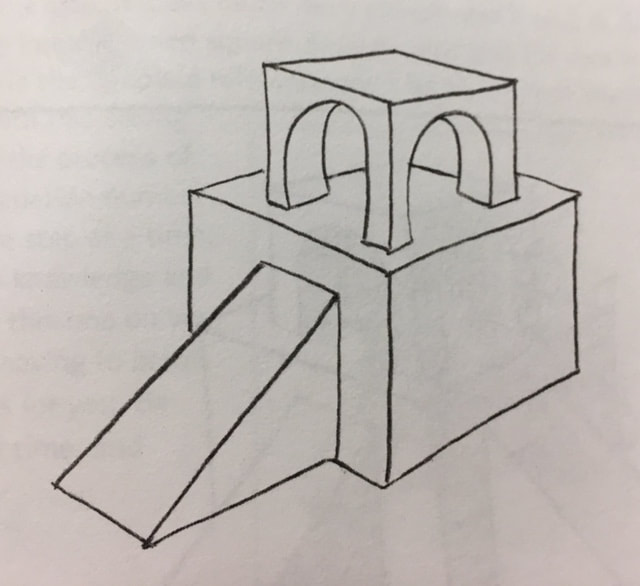
4) Draw the other side of the box lid lifting up with two parallel lines.
5) Using the bottom of the box line in direction NE, draw the top of the lid in direction NE.
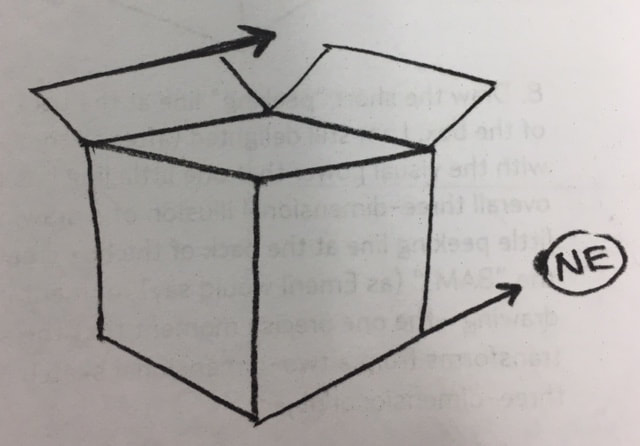
6) Sketch in the two near lid flaps slanting down in front of the box.
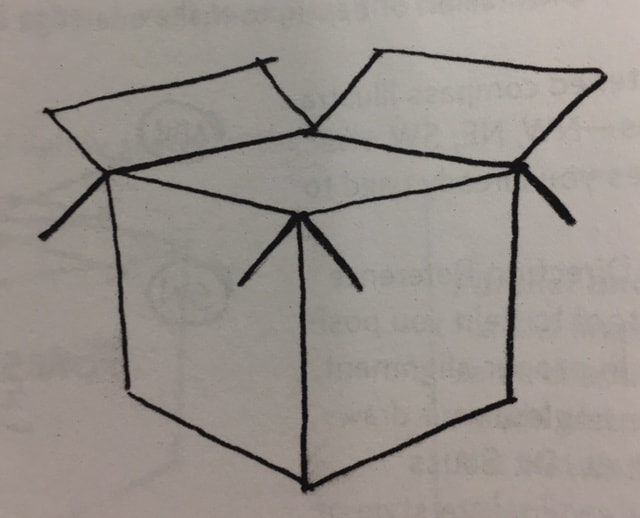
7) Once again, using the bottom of the box angles to guide your line directions, complete the near flaps, aligning them up in direction NE and NW. I will be repeating this idea often: Use the lines you have already drawn as reference angles to draw additional lines. By always referring to the lines you have already drawn and by continually checking you angles against the Drawing Direction Reference Cube, your drawings will look solid, focused, and, most importantly, three- dimensional.
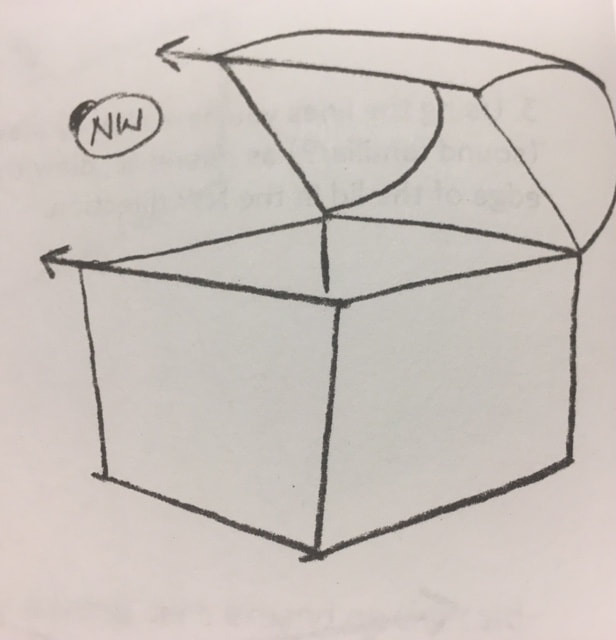
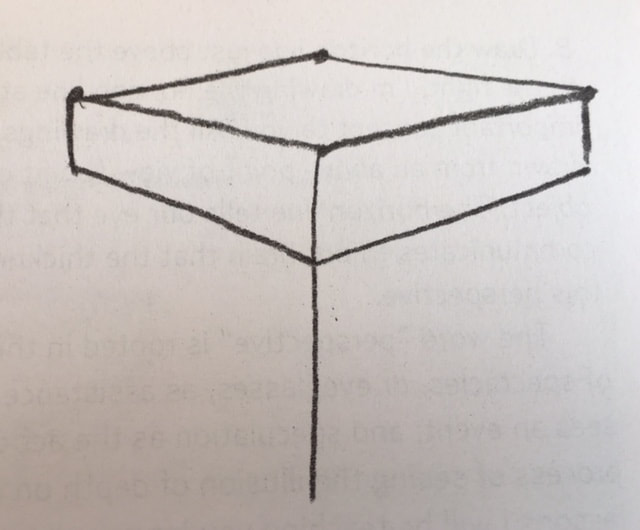
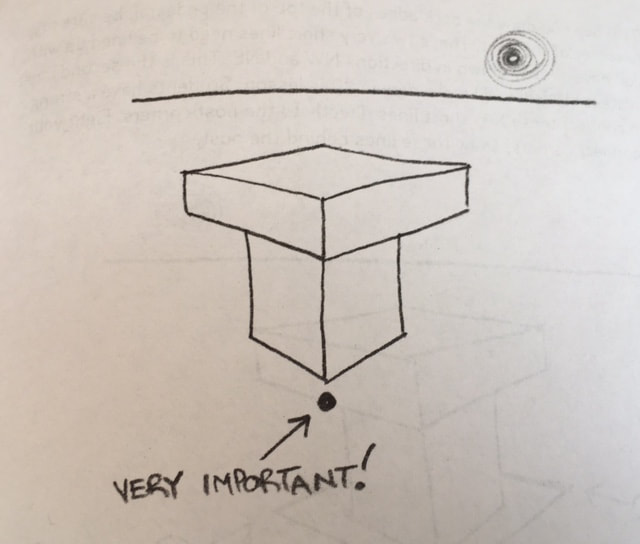
8) Draw the short "peeking" line at the back interior of the box. I am still delighted with the visual power that one little line has on the overall three-dimensional illusion of a drawing. This little peeking line at the back of the box creates the "Bam!" moment in our drawing- the one precise moment that the sketch transforms from a two- dimensional sketch into a three- dimensional object.
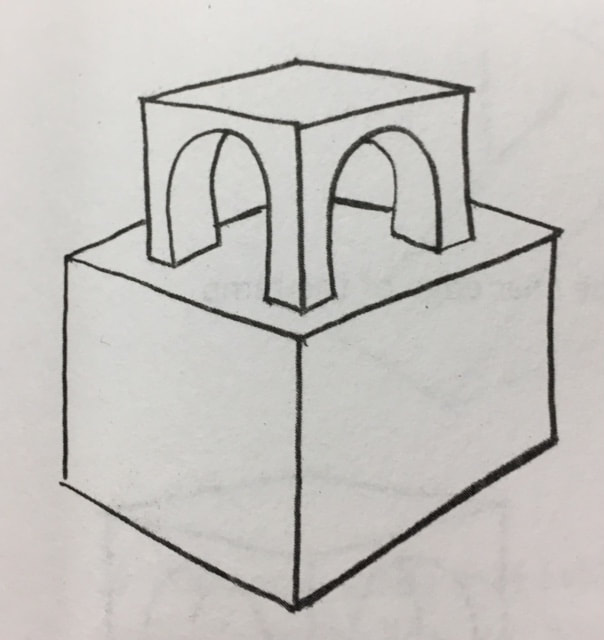
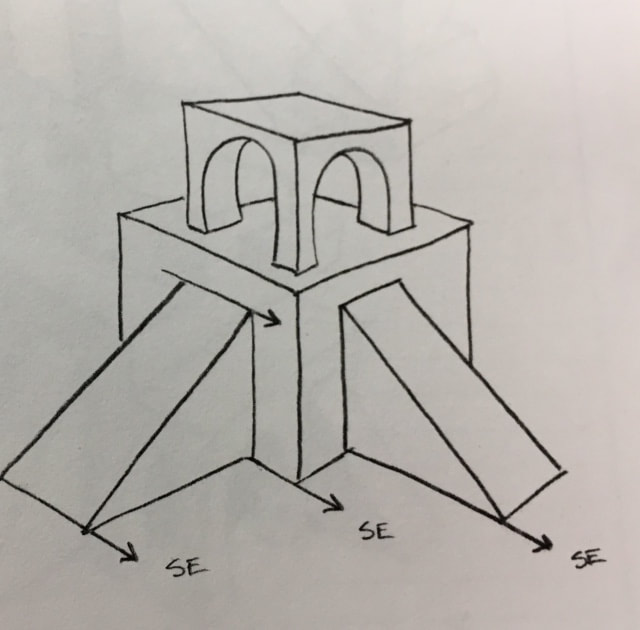
9) Establish your horizon line and your light source position.
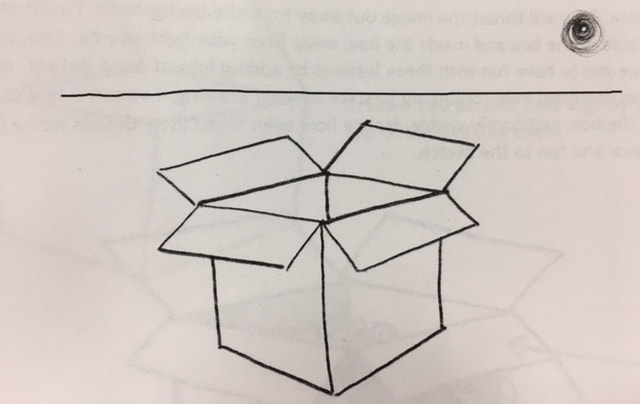
10) To properly draw the cast shadow, use the Drawing Direction Reference Cube as reference. Draw a guide line extending from the bottom of the box line in drawing direction SW. Droop alert! This is the most common point where students tend to droop the cast shadow guide line. Notice how the cast shadow below lines up with the guide lines.


11) Darken under the two front overlapping flaps as below, creating the under shadow effect. Under shadows are terrific little details that successful illustrators exploit to pop out objects, refine detail, and sharpen edges. In this specific drawing, under shadows have the power to really pull the overlapping lids towards the eye, while pushing the actual box deeper into the picture.
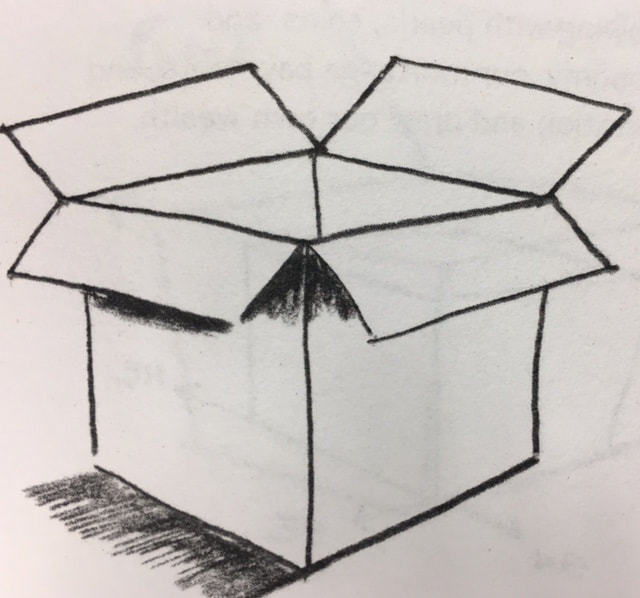
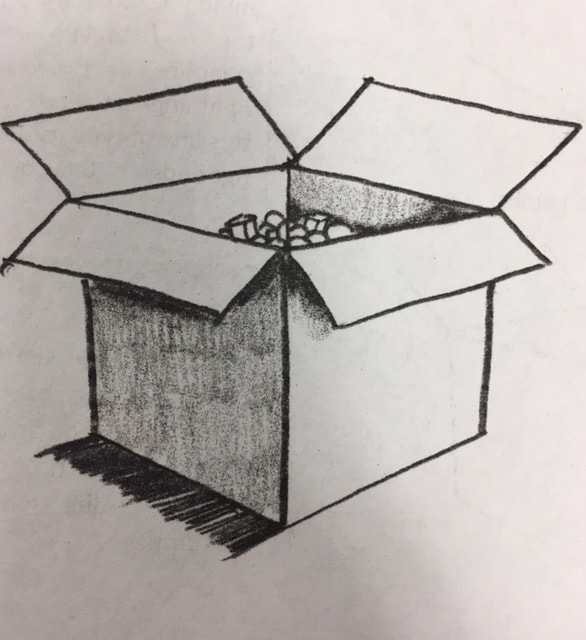
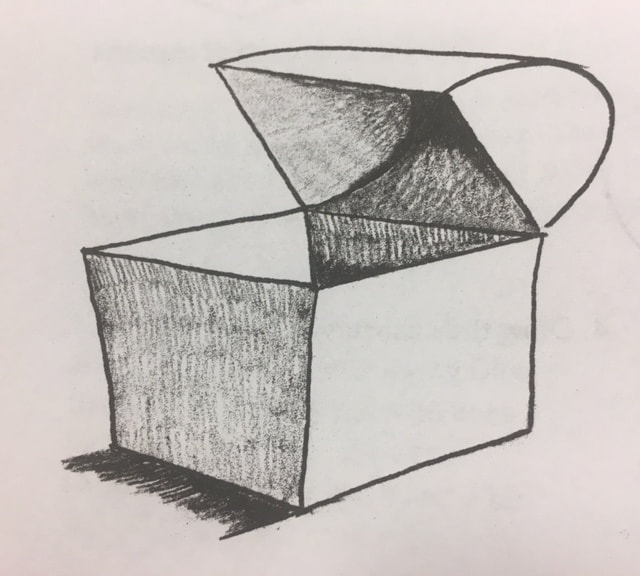
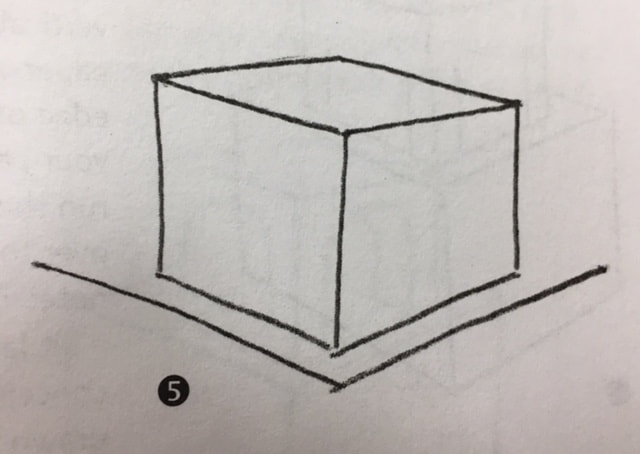
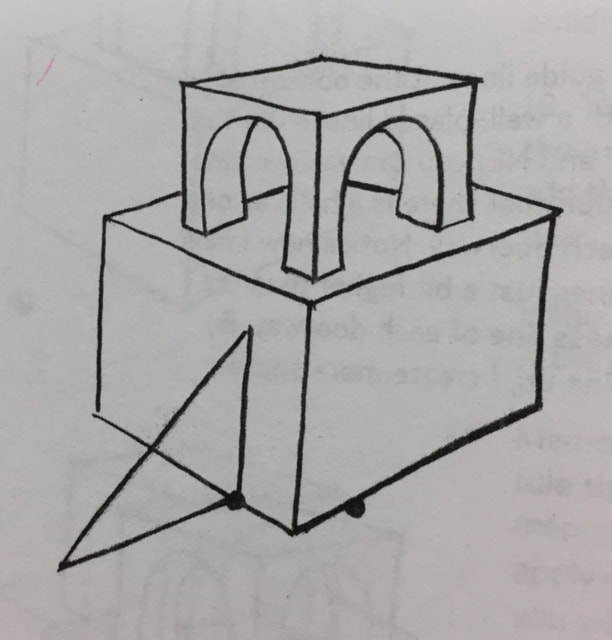
12) This is the most rewarding step of each lesson. Clean up your sketch by erasing the extra sketch lines, and sharpen the outside edges of the drawing by darkening the outline. This will thrust the image out away from the background. Finish shading the left side of the box and inside the box, away from your light source. I always encourage you to have fun with these lessons by adding lots of extra details, neat little ideas you creatively conjure up to spice up your drawing. I've put a few small items in the box, just barely visible. Notice how even these little details add a lot of visual flavour and fun to the sketch.
Lesson 5: Bonus Challenge
Speaking of adding extra details to enhance your drawing, let's expand on the cardboard box lesson. How about a treasure box overflowing with pearls, coins, and priceless loot?
1) Beginning with our basic cube, go ahead and draw in the Drawing Direction Reference Cube direction lines for good practice and memory imprint. Slant the sides in just a bit.
2) Draw two parallel lines slightly opening the top of the treasure chest.
3) Using the lines you have already drawn (sound familiar?) as a reference, draw the top edge pf the lid in the NW direction.
4) Draw the near curving edge of the lid.
5) Using the lines you have already drawn (am I sounding repetitive?) as a reference, draw the top edge of the lid in direction NW. Notice how the example has slanted the top edge line a bit more than a direction NW line. This is because eventually all these NW direction lines will converge on a single vanishing point. I will explain this vanishing- point concept in great detail in a later lesson. For now, just follow my steps and slant your top edge line a bit more.
6) Draw the two inside "peeking" lines. This is our "BAM" punch- out in 3-D moment!
7) Detail your drawing. Clean up any extra lines. Position your light source and add shading to all the opposite surfaces, darken the under shadows, and draw the cast shadow. Enjoy drawing the extra details to this lesson. Draw overflowing money, jewels, and pearls to your heart's content!
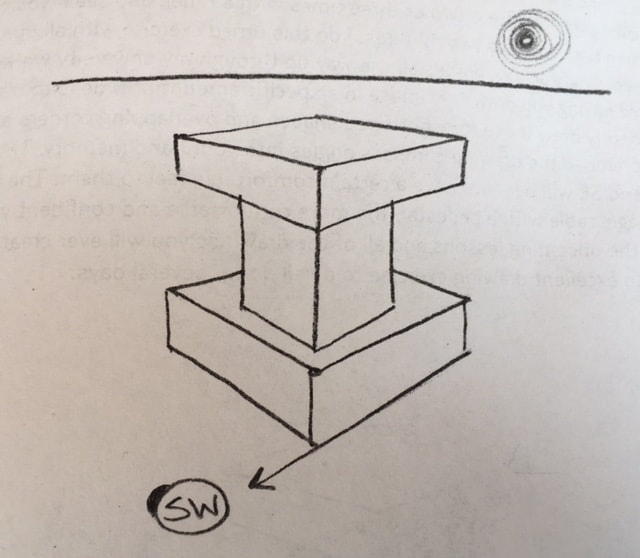
Lesson 6- Stacking Tables
1) Begin with a strong foreshortened square. Remember, I urge you to use the guide dots for all the lessons in this unit. I know that some of you are now feeling very confident with your foreshortened squares, boxes. and cubes. However, humour me and use the guide dots each and every time.
2) Draw two short edges to create the top of the table.
3) Draw the middle line longer, using what extremely important drawing concept?

4) Using the lines you have already drawn as reference, draw the bottom of this table top in directions NE and NW.
5) Draw the middle line longer to create the near edge of the table post.
6) Draw the sides of the table post as below. Notice how each side line is drawn halfway from the far edge to the middle line. Look at the example. This is definitely a case where a picture is better than a bunch of words.

7) Using the lines you have already drawn as reference (I'm actually going to start cutting and pasting that sentence in each of these steps!), draw the bottom of the table post in directions NW and NE.
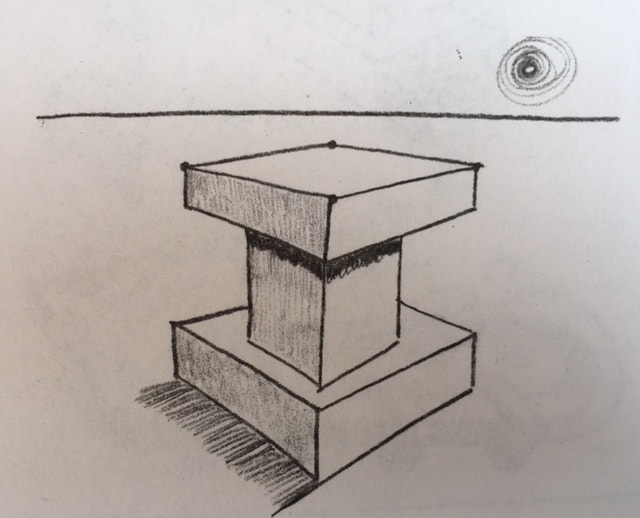
8) Draw the horizon line just above the table, and position the light source above and to the right. The horizon line is drawn in the image below to illustrate an important concept to you. All the drawings we have completed so far have been drawn from an above point of view (point of perspective), looking down at the object. The horizon line tells our eye that the object is below the horizon line, which communicates to our brain that the thickness, shadows, and foreshortening are from this perspective.
The word "perspective" is rooted in the Latin spec, meaning "to see." Think of spectacles, or eyeglasses, as assistance in seeing; a spectator as someone who sees an event, and speculation as the act of seeing possibilities. Perspective is the process of seeing the illusion of depth on our two- dimensional surface. In later lessons I will be teaching you how to draw objects above the horizon line with one- point and two-point perspective. For now, just remember that the position of the horizon line is above the object if you draw it in a looking- down point of view.
The word "perspective" is rooted in the Latin spec, meaning "to see." Think of spectacles, or eyeglasses, as assistance in seeing; a spectator as someone who sees an event, and speculation as the act of seeing possibilities. Perspective is the process of seeing the illusion of depth on our two- dimensional surface. In later lessons I will be teaching you how to draw objects above the horizon line with one- point and two-point perspective. For now, just remember that the position of the horizon line is above the object if you draw it in a looking- down point of view.
9) ALERT! Very important step! Place a guide dot directly below the near corner of the table post. Many students forget to use this guide dot during this exercise- to the detriment of their drawings. If you don't use the guide dot on every stacked table, your drawing may get progressively more skewed and impossibly distorted. A cool visual effect if you are channeling Andy Warhol, but a disaster if you are aiming for a sharp, focused, properly proportioned, foreshortened three- dimensional stack of tables.
10) Using the lines you have already drawn as reference (yes, again!), draw the front edge of the pedestal in directions NW and NE.
11) ALERT! When you draw the back edges of the top of the pedestal, be sure to go behind the corner of the post. These two very short lines need to be lined up with the lines you have already drawn in directions NW and NE. This is the second most common mistake students will make drawing this lesson. Students have a strong tendency to connect these two short lines directly to the post corners. Fight your instinct to connect corners! Draw these lines behind the post.
12) Complete the pedestal, making sure to draw the near corner lower. As always, use the lines you have already drawn as reference angles for drawing the bottom lines of the pedestal in directions NW and NE.

13) Using the lines you have already drawn for reference, extend out the cast shadow direction guide line.
14) Add the cast shadow opposite your positioned light source, shade the table and pedestal, and add the dark under shadows of both sides of the post. Notice how that nice dark under shadow really pushes that post feel under the tabletop. There it is, another BAM moment for our lesson!
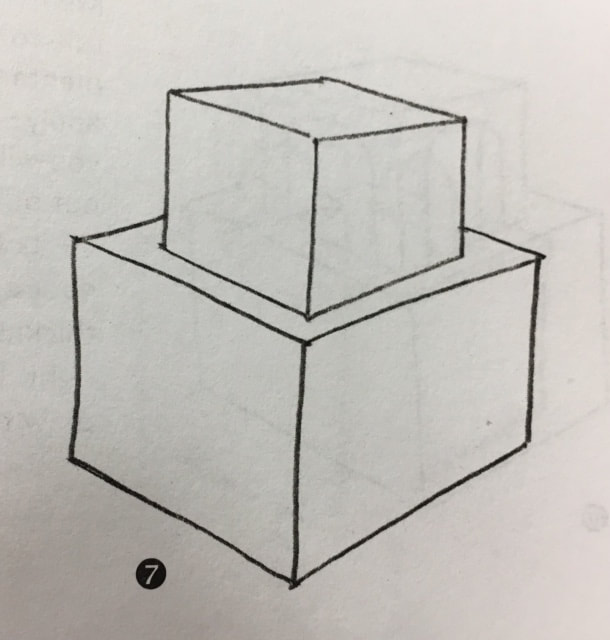
Lesson 7- Advanced Level Cubes
In this lesson I want to build on this pivotal skill of drawing 3- dimensional cubes. I want you to be able to have complete control of drawing the cube and the ability to manipulate it into many more advanced shapes. You will soon discover in later lessons the ability to manipulate the cube will enable you to draw a house, a tree, a canyon, and even a human face. "How can you transform a boring cube into a tree or a human face?" you ask. I'll tell you... later, but first...
1) Using guide dots (as you will for all the lessons we do, right?), draw a well practiced sharp foreshortened square.
2) Lightly draw the sides down, and draw the middle line longer (sketch lightly as these are just the beginning shape- forming lines).
3) Draw the bottom of the cube using the lines you have already drawn as reference. For the purpose of review, go ahead and extend all of you direction NW and NE lines out as done in the example below.
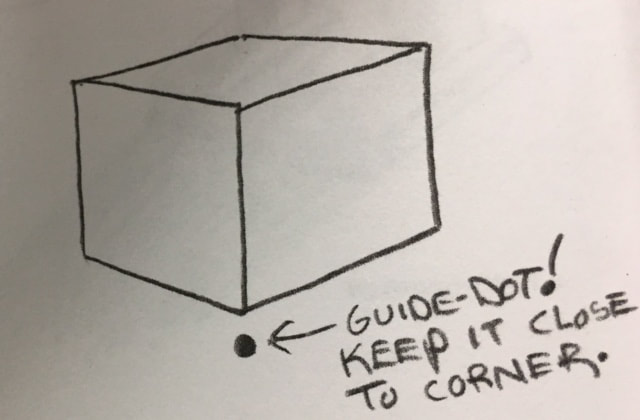
4) Draw the all- important guide dot just below the near corner. This guide dot determines the angle of your foreshortened second layer. If your guide dot is placed too low, it will distort the layer and throw the entire building out of alignment.
5) Using the lines you have drawn for reference, draw the near edges of the second tier in directions NE and NW. When I am drawing, I still dart my eyes back and forth constantly between my first "primer" compass angles to each line angle I am adding.
6) Look at your NE angle at the top foreshortened square of your box. Now, look at all the NE drawing compass direction arrows you drew in step 3. Now, take your pencil and trace over those direction lines lightly to embed the angle of the line into your hand memory. After a few of these rehearsal pencil strokes, quickly move your hand to the left of the cube and draw the direction NE line behind the corner. Repeat this same technique to draw the NW line on the other side to create the top of the second layer of the building. I do this rehearsal shadow drawing all the time, with every drawing I create. I am constantly referring back to my initial foreshortened square source, shadow drawing the angles again and again and again before dashing off the lines that build my drawings.

7) Complete the second layer of the building. Double check your bottom lines against drawing compass direction arrows NW and NE.
8) Begin drawing the doors on the top level with two vertical lines on each side. To make sure your lines are actually vertical, straight up and down, look at the edge of your paper. All of your vertical lines should be parallel with the edge of your paper. You should glance at the vertical edge of your paper every time you are drawing a vertical line, or you run the risk of the objects in your picture severely leaning over to one side or the other. Here's an interesting point to note: The near edge line of each doorway needs to be drawn larger to create the three- dimensional illusion that it is actually closer to you. This underscores a fundamental principle of drawing: To make an object appear closer to your eye, draw it larger than other objects in the picture.
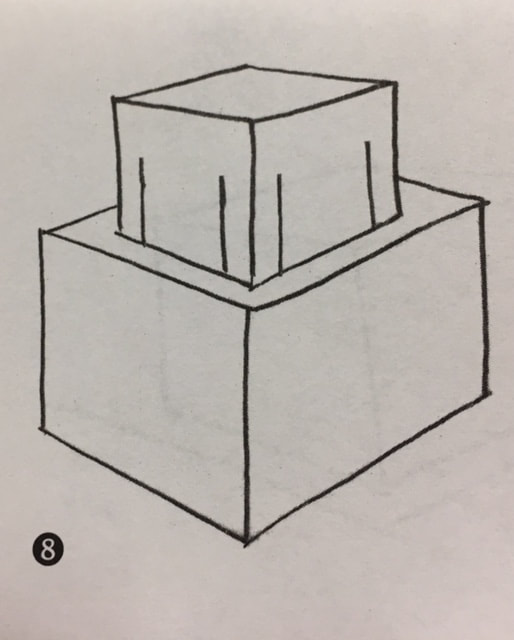
9) Curve the tops of both doorways on the top floor of the building.
10) To create the illusion that these doors actually exist as three- dimensional entrances to this building, we need to add thickness to them. Let's review the simple thickness rule:
If the door is on the right, the thickness is on the right.
If the door is on the left, the thickness is on the left.
Memorise this rule, repeat it, and practice it. This thickness rule will always apply- to any door, window, hole, or entrance to any object you will ever draw. Knowing this rule by heart will get you out of many a drawing quandary in complicated renderings.
Let's begin applying this important thickness rule to the door on the right side first. If the door is on the right, the thickness should be on which side? Yes, you've got it: the right. Using your drawing compass lines in direction NW, draw the bottom thickness on the right side of the doorway.
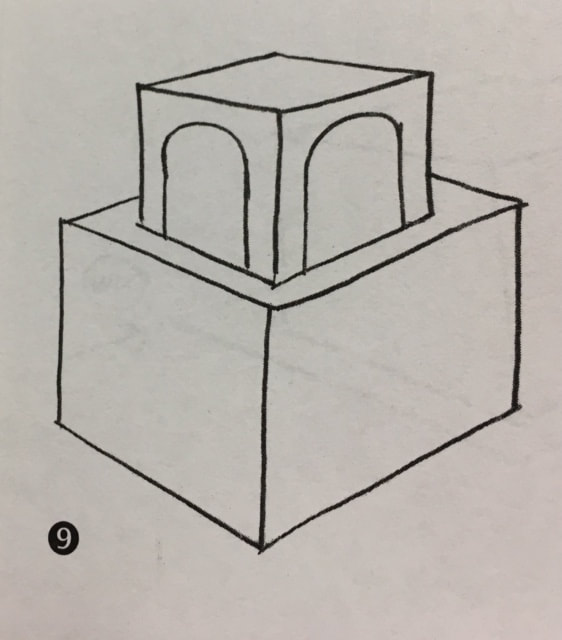
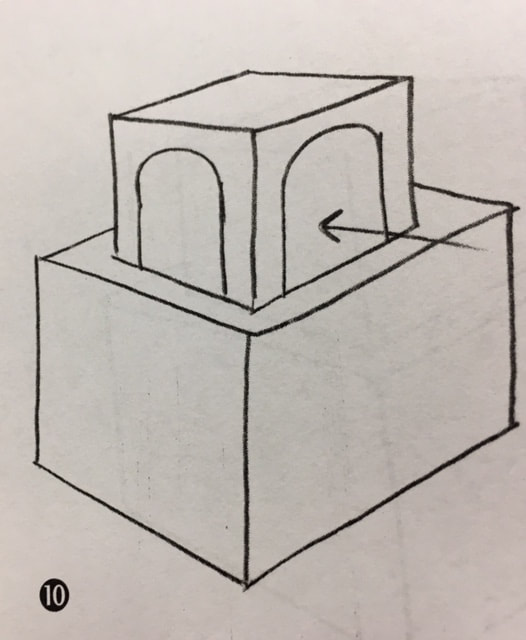
11) Comlete the door by following the line of the exterior door as it curves up.
12) Look at the door on the left side. Using the drawing compass direction NE lines you drew earlier as reference, draw the thickness on the left- side door on the left side of the entrance.
13) Erase your guid lines at the bottom of each door. With a well- placed line in drawing directions NW and NE, you can easily create the visual illusion that there is a hallway to a room inside each doorway. Notice how the example has these lines just a bit higher than the bottom thickness line of each doorway. By nudging this line up, you create more space.
14) Now, with some interesting wedges you can develop these into entrance ramps or quick- exit- end- of- school day slide ramps or skateboard ramps. This is a great example of why drawing in three dimensions is such a magical skill to master. You are developing the skills to create buildings, cities, forests, or entire worlds on a blank two- dimensional piece of paper. One pencil, one piece of paper, your imagination, and the skills I am teaching you here are all the ingredients you need to create your own world.
Draw two guide dots on either side of the building.
Draw two guide dots on either side of the building.

15) Let's create the ramp on the left side first. Draw the vertical back edge of the ramp against the wall, and extend the bottom edge of the ramp out in drawing compass direction SW. We used this direction often when drawing our guide lines for cast shadows in our previous lessons. In fact, we will be using this SW direction line again for a cast shadow on this building a little later in this lesson. Be vigilant in maintaining this direction SW line. Triple- check it against your earlier lines in NE because NE and SW lines are identical, just a different stroke direction of your hand. This is definitely an idea that is much easier to explain with visual examples than with words.

16) Complete the near edge of the ramp.
17) Draw the thickness of the ramp with two lines in direction NW, matching the angles with the lines you drew earlier in the direction NW.
18) Complete the far edge of the ramp by matching the angle of the front edge (another good example of parallel lines). Notice how the example has the bottom of the face of ramp a tiny bit larger than the top. You must always keep in mind the effect of size in your drawing. To reiterate, to make objects appear closer, draw them larger. To make objects appear farther away, draw them smaller. In this case, I want the bottom of the face of the ramp a bit larger to strengthen the visual illusion that it is closer to our eye. It's this constant application of these small details, using these important drawing laws (size, placement, shading, shadow, etc.) and the drawing compass directions (NW, NE, SW, and SE) that give you the skills and confidence to sketch anything in three dimensions.
19) Erase your guide lines behind the ramp. Using the lines you already drew in direction NE as reference (keep glancing at those lines as you are drawing new ones to match up the angles), draw the ramp on the right side. Remember: Beware of the tendency to droop the bottom line. No drooping!
20) Complete your two- layered foreshortened ramp building by drawing the horizon line above the building, positioning your light source, and shading all the surfaces opposite your light position. Using your reference lines to angle the cast shadow correctly in direction SW is really simple when you are drawing buildings; just extend the bottom lines. Erase any extra lines or smudges, and voila, you have completed your first architectural rendering. Congratulations!

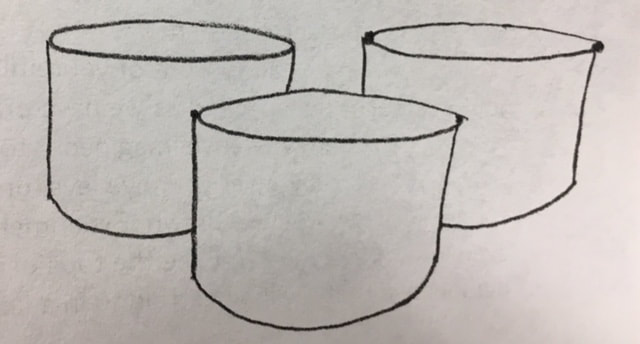
Lesson 8- The cylinder
In previous lessons we conquered the sphere and several variations of the sphere. We confidently drew the cube and several variations of the cube. In this lesson we will conquer another building block: the cylinder.
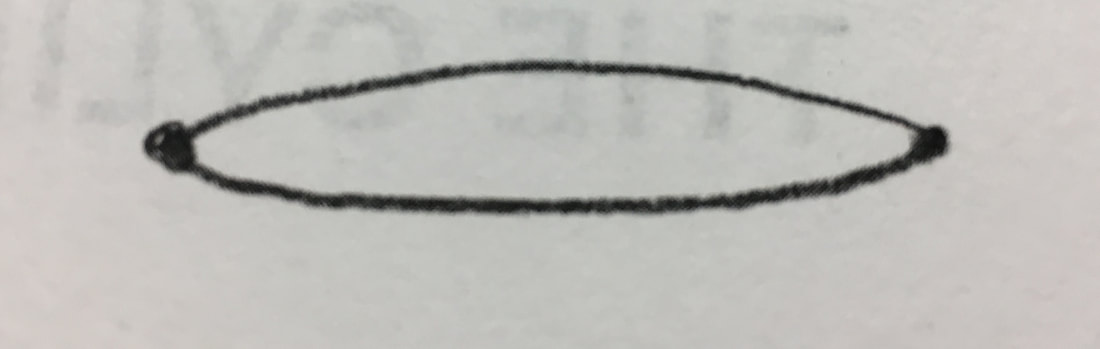
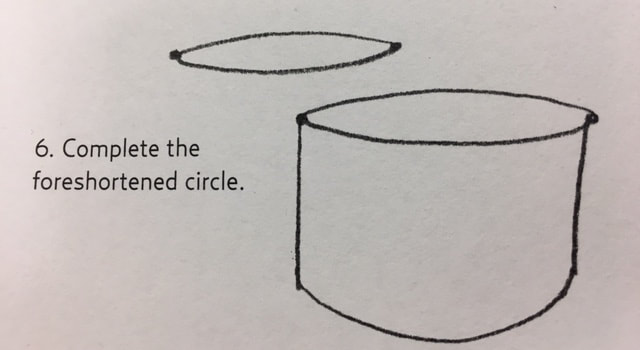
1) Draw two guide dots for your foreshortened circle.
2) Draw a foreshortened circle.
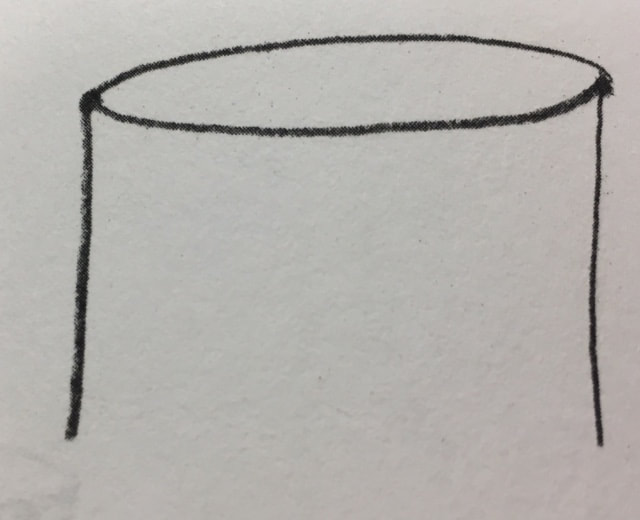
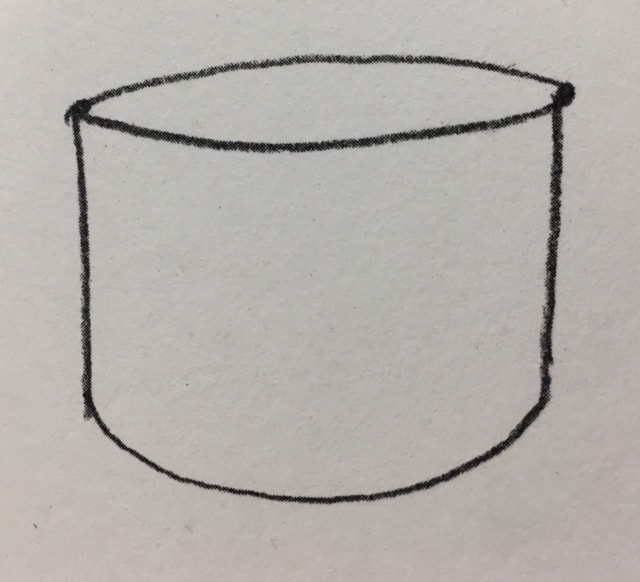
3) Draw the sides of the cylinder with two vertical parallel lines.
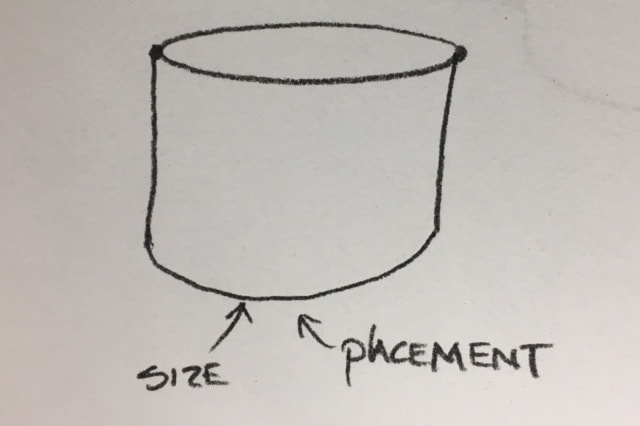
4) Curve the bottom of the cylinder, making sure to curve the bottom a bit more than the corresponding curve at the top. This bottom curve uses two key drawing concepts, size and placement, simultaneously.
5) To draw the back two cylinders, position the foreshorten circle guide dots above and to the left of the top centre of the first cylinder.
7) Draw the sides of the second cylinder. The right side tucks behind the first cylinder, using overlapping, which creates the visual illusion of depth.
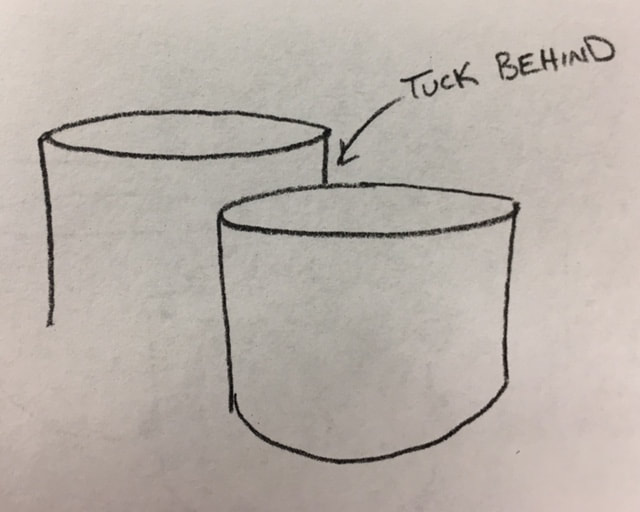
8) Curve the bottom of the second cylinder. Be sure to push this line up and behind the first closer cylinder. The natural tendency is to draw this line connecting to the bottom corner of the first cylinder. I don't know why, but most students do this over and over again. You can see where the example has a line placement guide dot on the left side of the near cylinder.
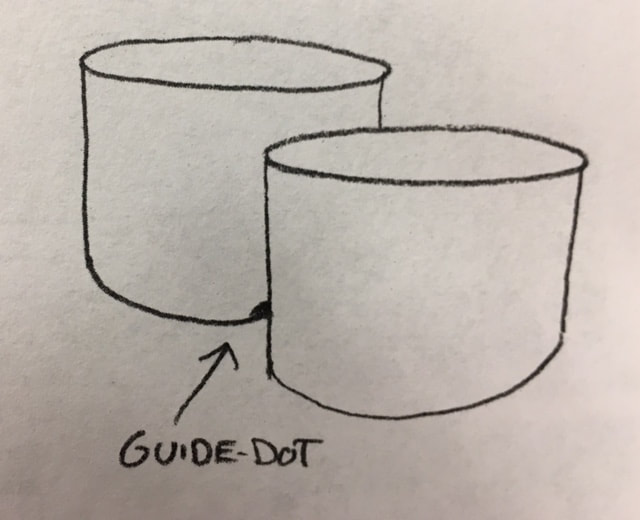
9) Begin the third cylinder with tow foreshortened circle guide dots off the top centre right of the first cylinder.
10) Draw the foreshortened circle. Notice how the second row of cylinders is a bit smaller than the first cylinder. Complete the third cylinder using overlapping, size, and placement.
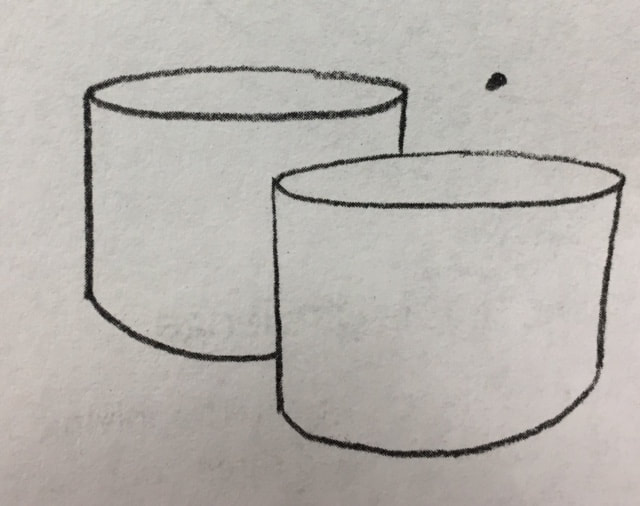
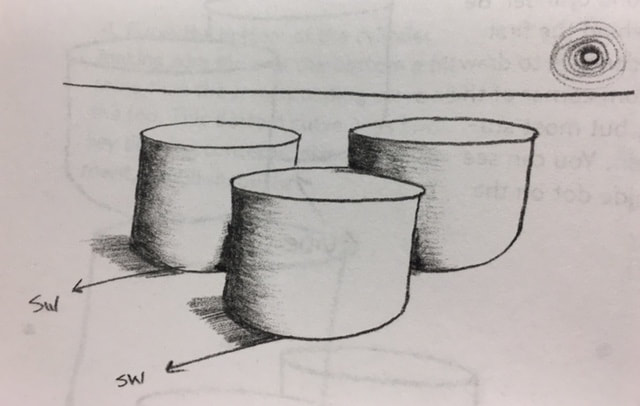
11) Draw the horizon line, and position your light source. I like to begin my shading process by darkening all of the small dark nook and cranny shadows.
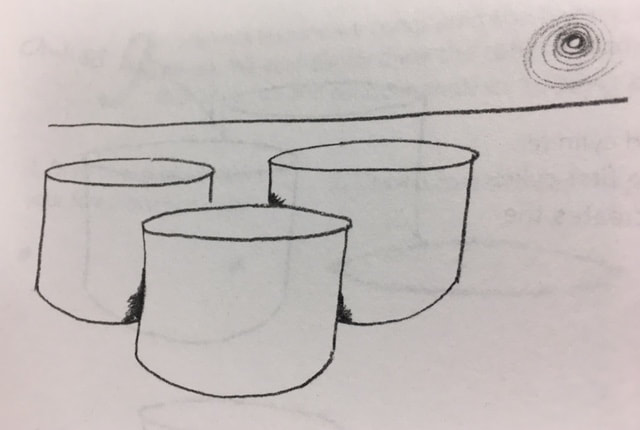
12) Complete this drawing of three cylinders. Add cast shadows, opposite your light source using blended shading. Make sure to use a direction SW guide line to place your cast shadow correctly.
Lesson 9- Advanced Level Cylinders
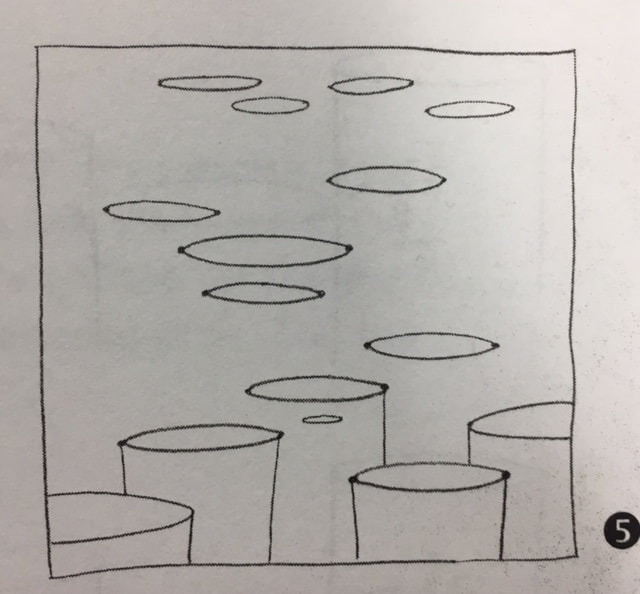
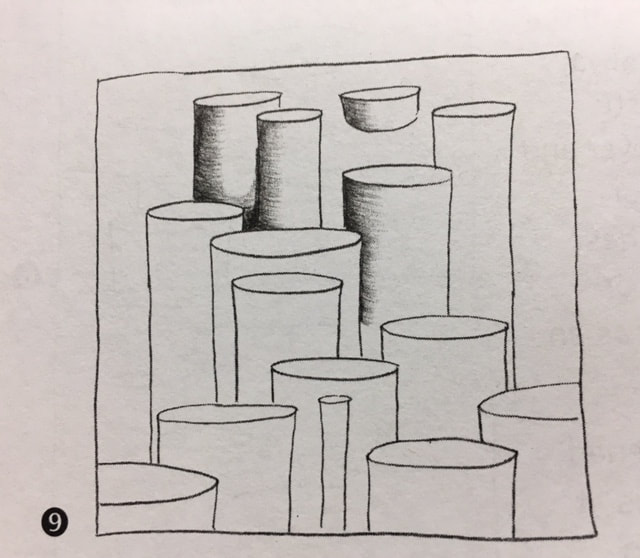
In this lesson I will explore the fun visual effect of drawing multiple cylinders in a cityscape scene. The skills we will be practicing in this drawing are overlapping, foreshortening, blended shading, shadows, and nook and cranny shading. While practicing these skills, we will also push the envelope and expand our understanding of the Nine Fundamental Laws of Drawing. Look at the lesson illustration below...
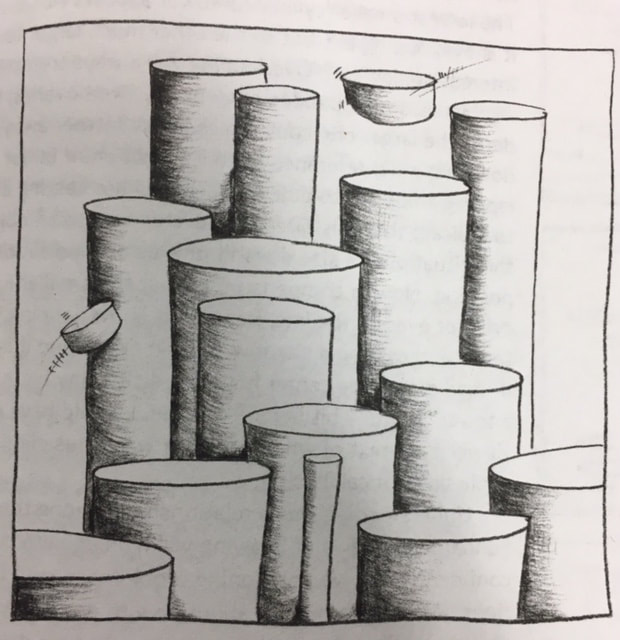
Everything looks fine and organised according to the Nine Laws. However, take a closer look at the lowest cylindrical tower. It is much smaller than the surrounding towers, so according to our understanding of the laws, it should appear farther away. Yes? This is an example of how some design laws have more visual power than others. The lowest smaller cylindrical tower appears closer because it is overlapping in front of the other much larger towers. Interesting, isn't it? Overlapping will always trump size.
Here's a mind bender. Look at the two hovering cylinders. The larger one could be closer or farther away. We don't have any reference as to its position. It is not overlapping an object to pull it closer; it is not casting a shadow to indicate that it is directly above or next to an object. In this situation, its size doesn't give us any indication of its position. Now in comparison, look at the smaller hovering cylinder over on the left. Because it is overlapping the other tower and casting a shadow, we can determine it is closer. If the centre hovering disk had been drawn a tiny bit in front of a tower, or a tiny bit behind a tower, it would have given the viewer a context of where the disk was, thus eliminating a confusing optical illusion.
Understanding these relationships among the Nine Fundamental Laws of Drawing will help you effectively and confidently resolve positioning problems in your illustrations.
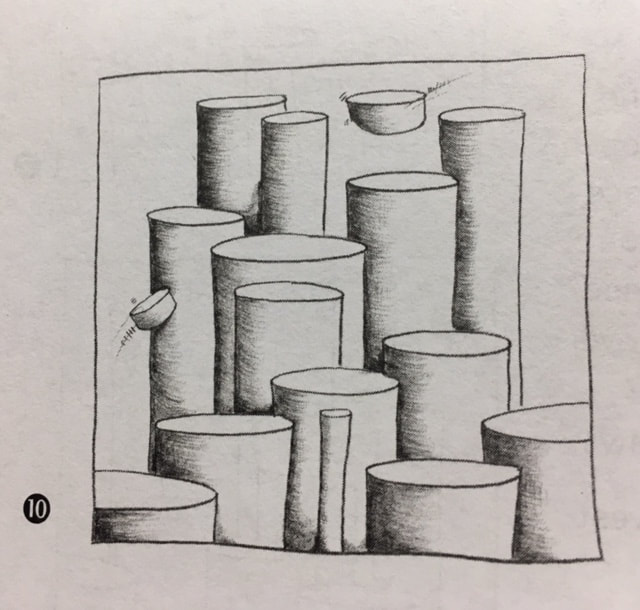
1) Draw a large picture frame, taking up an entire page of your sketchbook. Sometimes it's fun to place your drawing inside a drawn frame.
2) Using guide dots, draw the first foreshortened circle.
3) Draw more foreshortened circles, some large, some small.
4) As you continue to draw more foreshortened circles, be sure to place some high in the frame.
5) Draw a few more foreshortened circles positioned slightly out of the frame. These peeking towers have a nice visual effect. Probably the most valuable tidbit I've heard over and over again is to position objects slightly off frame.
6) Draw vertical sides down from the lowest foreshortened circle. When you are drawing full scene pictures like this, it is always a good idea to detail in the lowest objects first. Why? Because the lowest objects will be overlapping every other object in the picture. One scenario where you wouldn't necessarily want to draw the lowest objects first is if you are drawing a space scene of planets (think a space scene from Star Wars). Another scenario would be if you were drawing a flock of birds in flight. The bird postponed highest in the fram might be drawn larger in size and overlapping other smaller birds lower in the frame. In both scenarios, overlapping still trumps all the other Nine Laws.
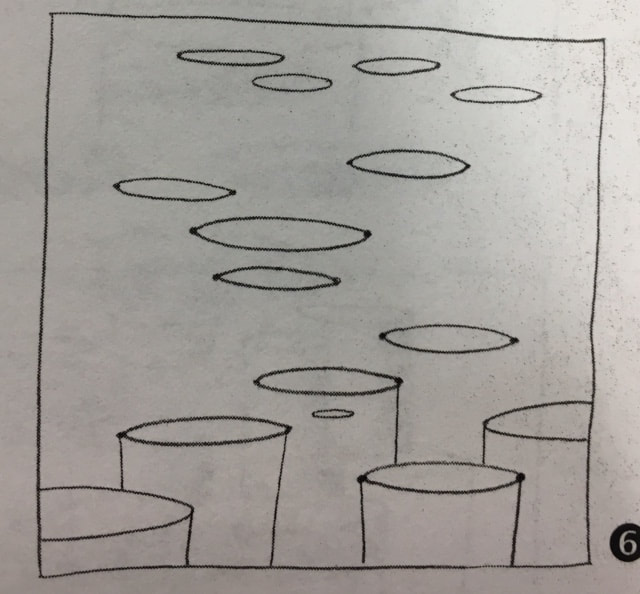
7) Continue drawing the vertical sides down for the lowest row of towers.
8) Concentrate on overlapping, drawing the important peeking lines down from each and every foreshortened circle.
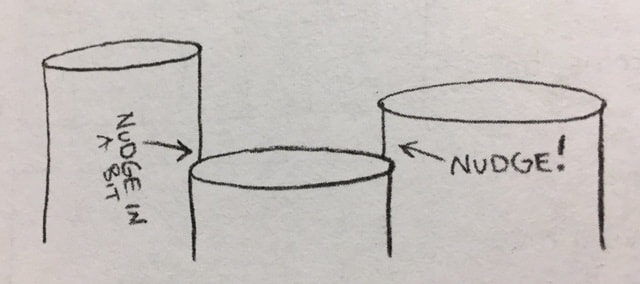
CAUTION: Avoid drawing the sides of the towers lining up like this:
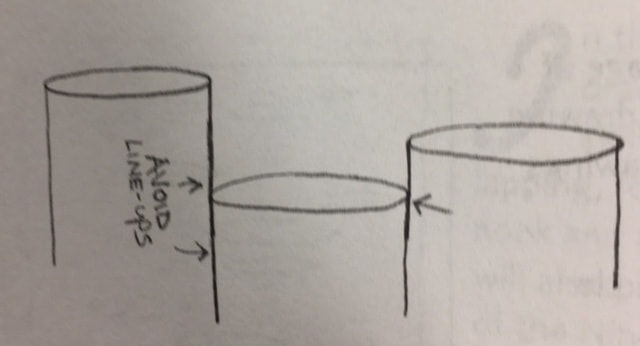
If this happens, go ahead and erase the edge and part of one of the foreshortened circles. Extend the erased foreshortened circle a smudge- just enough to ensure that it is overlapping behind or in front of the other tower. This idea of "offsetting' objects just enough so that the edge lines don't merge is a very small but helpful tip to put in your drawing toolbox.
9) Complete all the towers, moving from the lowest in the frame to the highest.
NOTE: There is one small problem you may encounter as you are drawing the towers. There's a tendency for your drawing hand to smear the lower towers as you move over them to draw higher towers. A simple practical solution to this is to place a small piece of clean scratch paper over the completed portion of your drawing, place your hand on the scratch paper, and draw the next row. Then pick up the scratch paper and reposition it higher. Do not push the scratch paper with your drawing hand to reposition it.
Begin your nook and cranny shadows at the top, and work your way down using your scratch- paper shielding. You want to avoid smearing your drawing during this detail phase.
10) Complete the blended shading on the remaining towers.
Lesson 10- Bonus Challenge
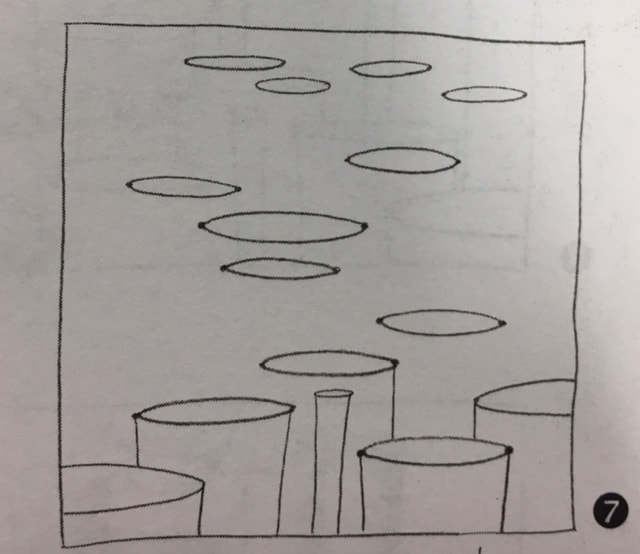
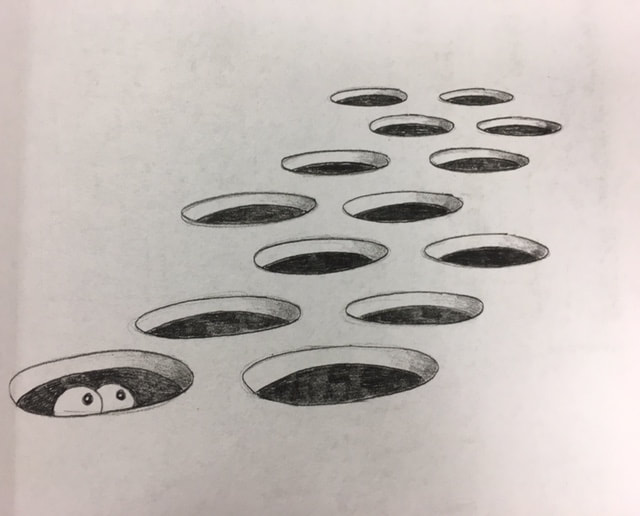
After that "towering success" (pun fully intended), let's reverse the exercise to practice foreshortened circles, size, placement, shading, shadow, and thickness. Let's draw a field of holes. Because these foreshortened circles are on "top" of the ground, the thickness of these holes will be at the top of the foreshortened circle. This is a fun challenge. Enjoy!
Lesson 11- Constructing With Cubes
Let's recap what we have learnt in this unit. You've mastered drawing spheres, multiple spheres, and stacked spheres all with blended shading. You have learned how to draw the cube, cube variations, multiple layered-cone buildings, and towers of tables and, most importantly, how to apply the drawing compass directions: northwest, southwest, northeast, and southeast. You will now use thee skills to draw a more real-world object. In this final lesson we will draw a house.
1) Draw a cube very, very lightly.

2) Draw a guide dot in the middle of the bottom line of the cube, on the right side.
3) Draw a very light vertical line up from this guide dot. This will be our guide to creating the roof of the house.
4) Connect the front slopes of the roof. Notice how the near slope is longer than the far side. This is a perfect example of how size and placement create depth. The near part of the roof is longer to make it appear larger and to create the illusion that it is closer to your eye.

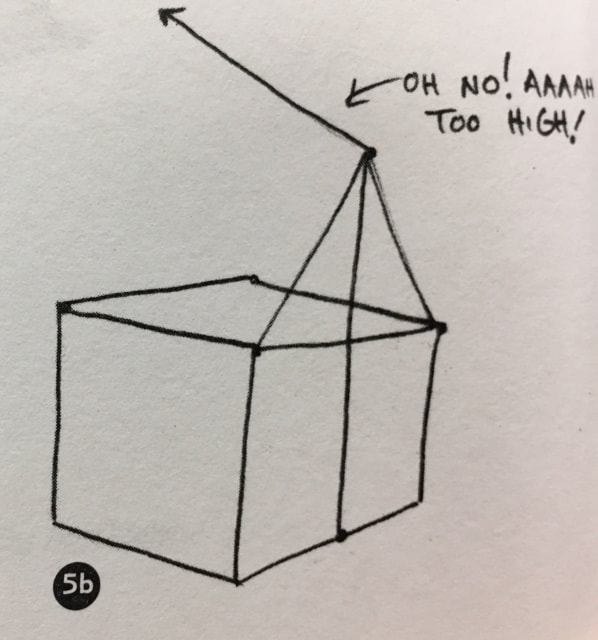
5) Using the lines you have already drawn as a guide, draw the top of the roof, being very careful not to angle this line too high (example 5b below). This is a problem many students initially have with this lesson. To avoid this, consciously and specifically refer back to your first lines drawn in direction northwest.
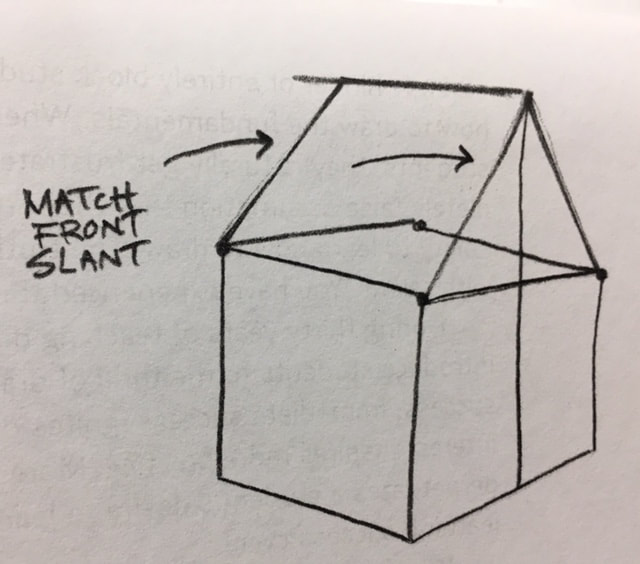
6) Draw the far side of the roof by matching the slant of the front edge. When I draw houses, I have found that slanting the far edge of the roof a little less than the near edge helps the illusion.
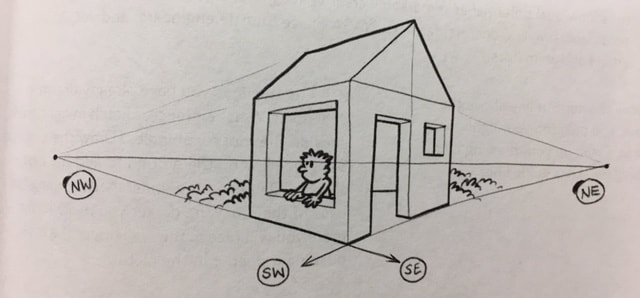
This is just a peek at the visual illusion of two- point perspective.
Look how fascinating it is to see the house lined up with drawing compass directions NW and NE and to see how they merge into a disappearing vanishing point on either side of the object. In fact, you have already been effectively using this advanced two- point perspective science in your three- dimensional drawings without even knowing it!
Look how fascinating it is to see the house lined up with drawing compass directions NW and NE and to see how they merge into a disappearing vanishing point on either side of the object. In fact, you have already been effectively using this advanced two- point perspective science in your three- dimensional drawings without even knowing it!
Now, take a moment to think about this: You have already been effectively using this advanced two- point perspective science in your three- dimensional drawings without even knowing it! Surprise, surprise!
A good analogy to this is that I can type on my laptop, yet not have a clue as to the mechanics of how a computer actually works. You can safely drive a car without understanding how the engine works. similarly, you can (and have!) successfully learned how to draw fundamental shapes without knowing the science behind it. I'm not saying that you shouldn't learn the science of vanishing- point- perspective drawing, because you should, and you will in later chapters. But what I a, saying is that too often, in too many classrooms, the immediate introduction of excessive, tedious drawing information can severely hinder or entirely block students from experiencing the initial fun of learning how to draw the fundamentals. When information- overload anxiety hits beginning students, they naturally get frustrated. They experience failure and accept a completely false assumption that they are void of talent and therefore do not have the ability to learn how to draw. The truth is that learning how to draw has nothing to do with talent. You have experienced this firsthand with these lessons.
The best way to introduce you to the thrill of drawing in 3- D is by first offering IMMEDIATE success. Immediate success ignites delight, enthusiasm, and MORE interest. More interest inspires more practice. More practice builds CONFIDENCE. And confidence perpetuates a student's desire to learn even more.
What we have seen in these lessons is that drawing absolutely is a learnable skill. Moreover, learning to draw can dramatically increase your communication skills- which can in turn have an extraordinary effect on your life.
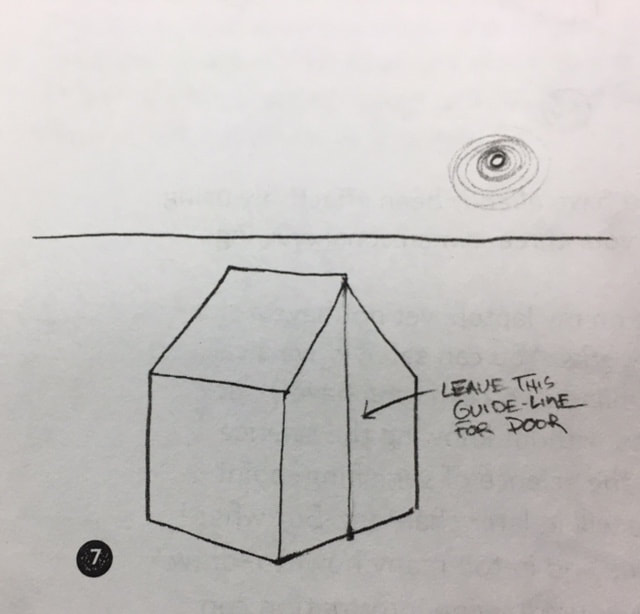
7) Draw the horizon line above the house, and position your light source. Clean up your drawing by erasing the extra guide lines.
8) Using the lines you have already drawn in directions NW as reference, sketch in light guide lines on the roof for shingles. Draw the direction SW guide line on the ground to add the cast shadow. Darken in the under shadow along the base of the roof. The darker you make it, the more you will recess the wall under the roof, pushing it deeper in the picture.
Complete the simple house with shingles, drawing the near shingles larger and reducing the shingles in size as they move toward the far side of the roof. Draw the windows, keeping your lines parallel to the outer wall edges. Same idea applies to the door. Draw the vertical lines of the door matching the vertical lines of the centre and right side of the house. The example has some shrubs scribbled in on either side of the house. Go ahead- bushes and shrubs are fun details to add.
10) Add thickness to the window and door. Complete the drawing with shading. Nice work! You have drawn a nice little house on the prairie.
